Can't wait to get crafting? Check our project schedule for the month.
Schedule currently being determined
Please feel free to share these projects with friends and family. These projects are not for sale and should not be sold to anyone. Note that our posted pdf files are supported by: Windows 98/ME/2000/XP/Vista/7/8 (x32/x64)
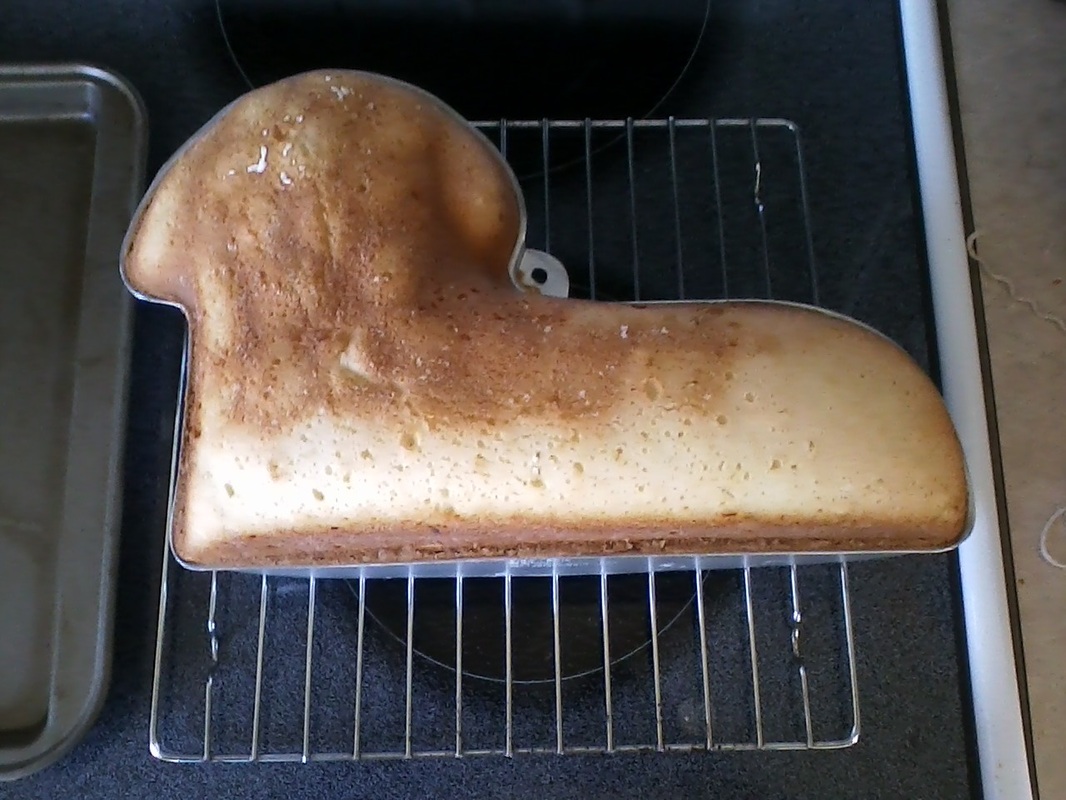
Wilton Lamb Cake
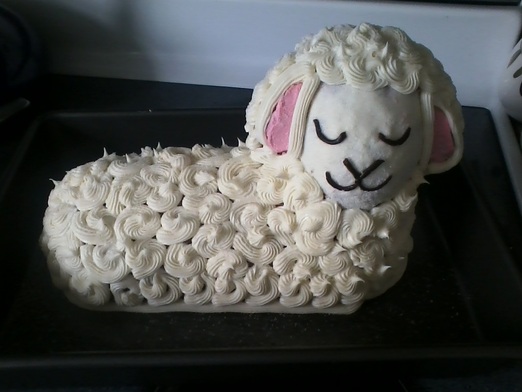
Today we are sharing with you the process of how to make this adorable 12 inch lamb cake for your Easter, baptism, christening, church gathering and other celebrations.
Before beginning be sure to wash your cake mold with dish soap and water. You will need the following to make your lamb cake, as we have it shown in the pictures we will share here and above.
1 lipped cookie sheet
baker's twine
Wilton lamb cake mold
1 box white cake mix -(other needed ingredients as described on the packaging)
shortening
flour
2 cans vanilla frosting
red food coloring
brown food coloring, or a small amount of chocolate frosting
freezer bags
frosting decorating tips
small bowl
3 spoons
wire cooling rack
cake sheet
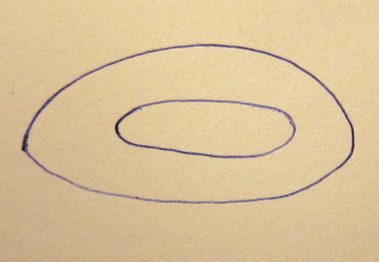
First, prepare your cake batter as the recipe originally describes. (1 cake box mix or enough for 1 9x13 cake or 24 standard cupcakes) Then prepare the cake mold by spreading shortening everywhere over the inside surface with a paper towel and coating it with flour and tapping and tilting the pan to make sure it is coated everywhere. Next place the mold on the cookie sheet "face side" down with the bakers twine underneath and stretched out roughly by the neck and around mid body. Fill the half of the mold slowly with your cake batter.
1 lipped cookie sheet
baker's twine
Wilton lamb cake mold
1 box white cake mix -(other needed ingredients as described on the packaging)
shortening
flour
2 cans vanilla frosting
red food coloring
brown food coloring, or a small amount of chocolate frosting
freezer bags
frosting decorating tips
small bowl
3 spoons
wire cooling rack
cake sheet
First, prepare your cake batter as the recipe originally describes. (1 cake box mix or enough for 1 9x13 cake or 24 standard cupcakes) Then prepare the cake mold by spreading shortening everywhere over the inside surface with a paper towel and coating it with flour and tapping and tilting the pan to make sure it is coated everywhere. Next place the mold on the cookie sheet "face side" down with the bakers twine underneath and stretched out roughly by the neck and around mid body. Fill the half of the mold slowly with your cake batter.
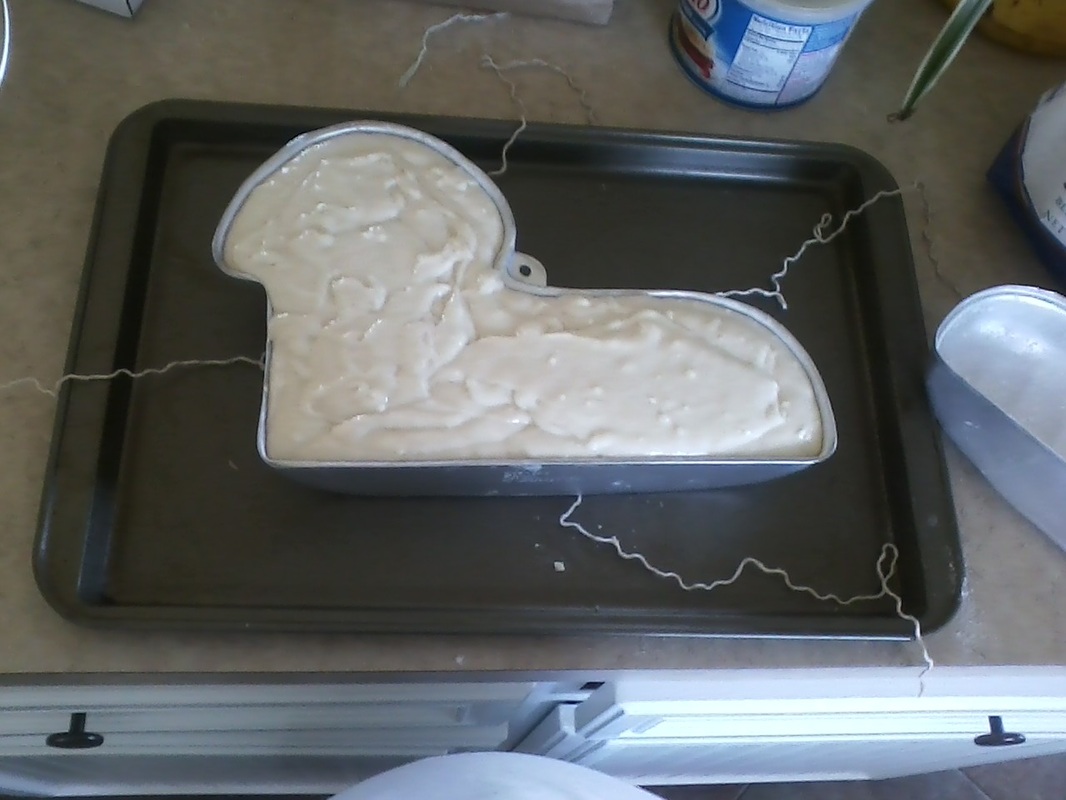
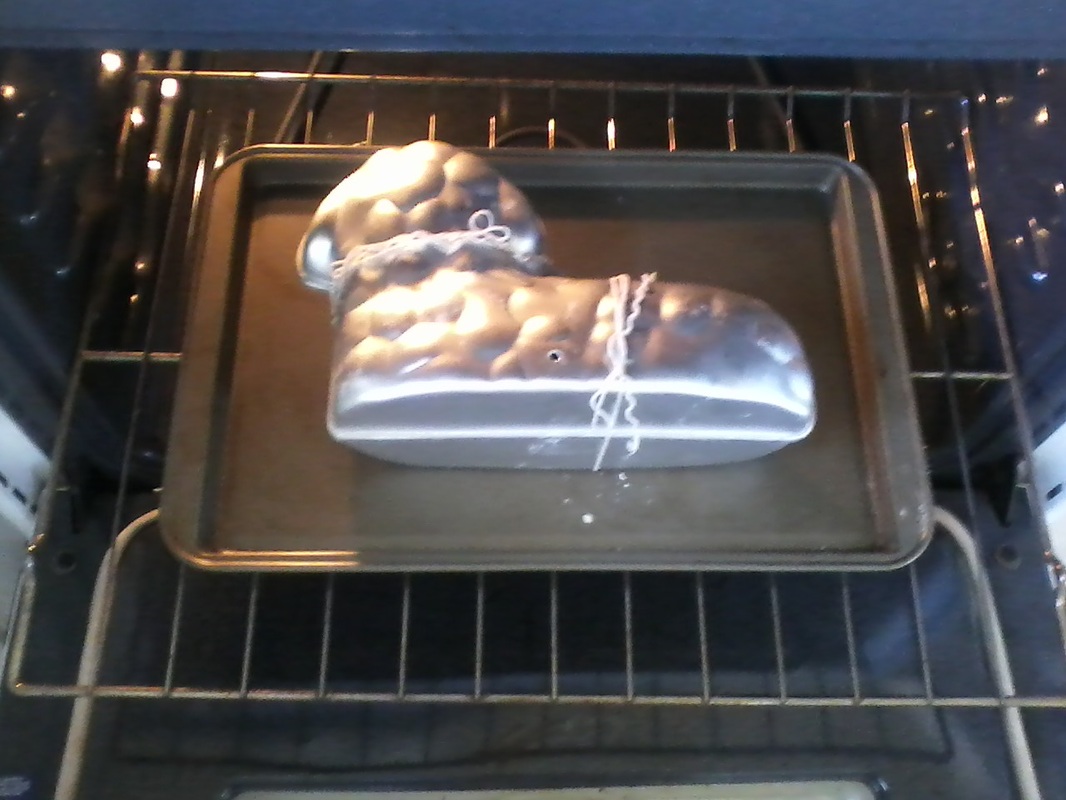
Prepare the other half of the mold with the shortening and flour as well. It is just as important to make sure that this side is well coated since the batter will "back up" to fill this half. Close the mold carefully, it will snap into place. Tie the baker's twine around the mold.
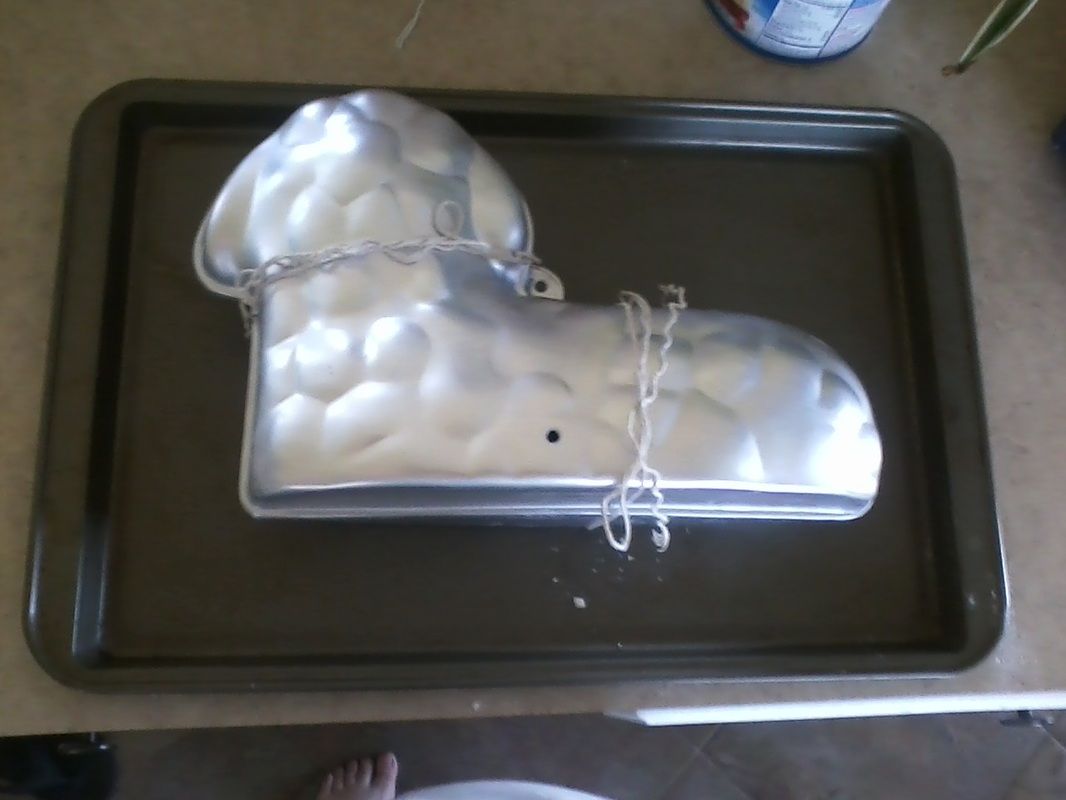
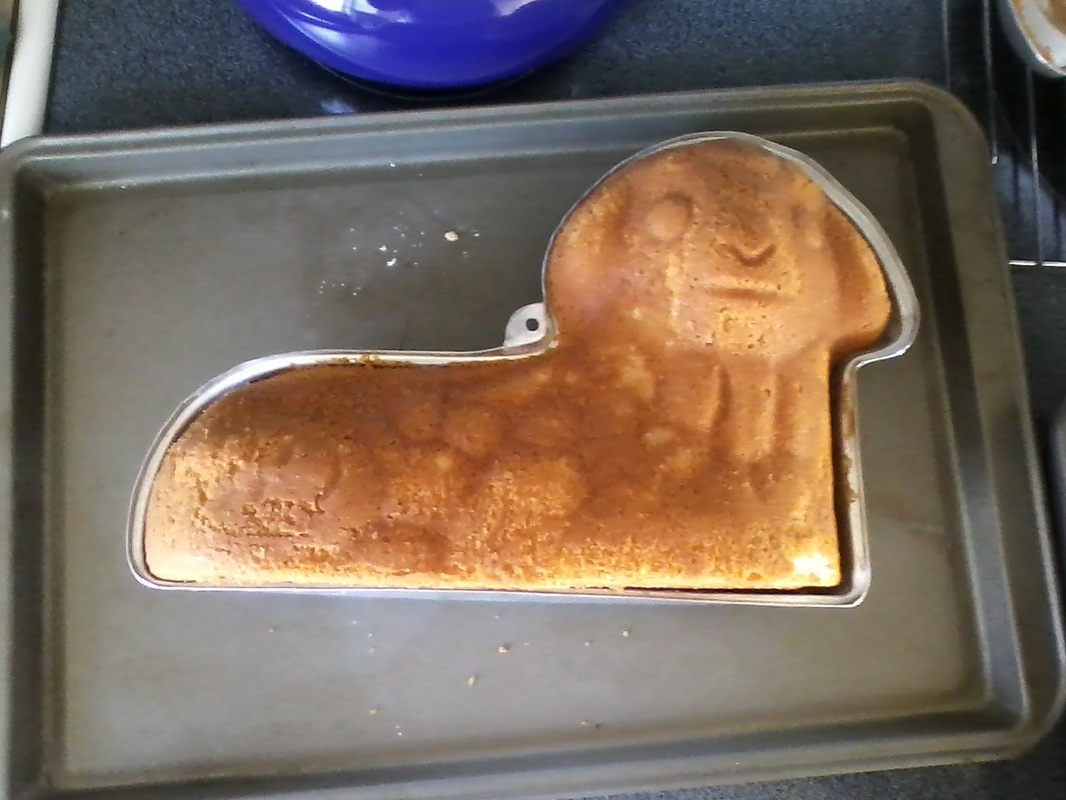
There are specific baking and cooling instructions on the Wilton cake mold package that you will need to follow. Be aware that this cake takes 3 to 4 hours to cool completely. Follow instructions as given on the package. The next pictures are to show how my cake ended up looking.
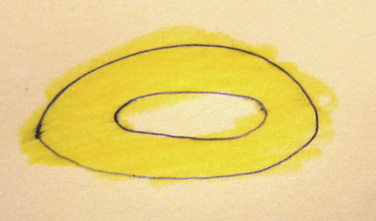
Once your cake is cooled you can start decorating. Here are the steps I used. While the cake is still on the cookie sheet: Spread vanilla frosting over the face of the lamb. Take approximately 1/4 cup of vanilla frosting and put it in a small bowl. Tint it with the red food coloring until the desired shade of pink. Spread the pink over the "inside" of the ears facing the front. Sprinkle the white sugar over the frosting to give it a slightly shinny look. At this point you can either transfer the cake to a cake sheet or leave it on the cookie sheet.
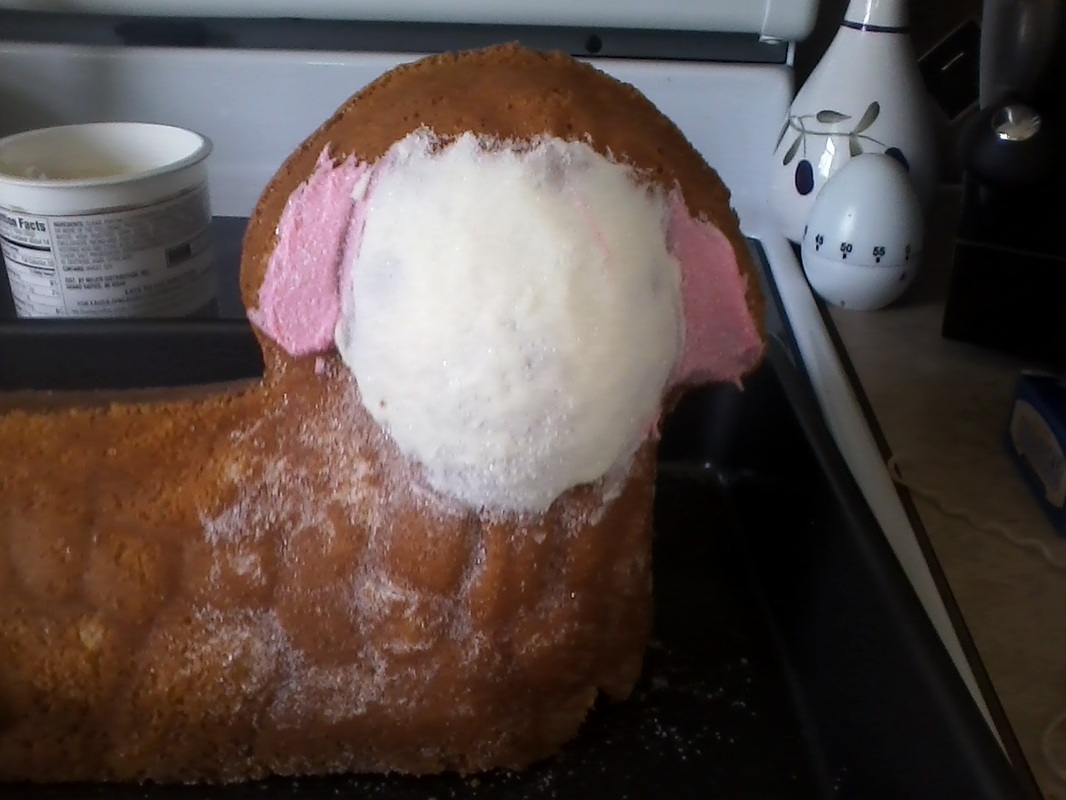
Using a decorating tip with triangle pointed ridges around the opening, support the standing cake around the base by piping a supporting strand where the cake touches the pan/sheet. Then beginning along the bottom and working toward the top of the back, pipe the frosting in a circle, ending by filling in the middle of the circle and lifting off. This make a "wooly" pattern. Sometimes the move uneven the rows of wool the better it looks. Pipe an outline around the pink part of the ears and continue the wooly pattern around the top of the head. You will need less than 1/8 cup of brown tinted or chocolate frosting for the face. Using a small round smooth decorating tip pipe the eyes (half circles) and nose and mouth ("V" with two half circles).

Now comes the fun part, enjoying your cute lamb cake! You and your guests will love how it looks and tastes as you celebrate.
Please note that if you used regular canned frosting as I did, you will want to clear space in your refrigerator to make sure the icing does not get hot and start to melt.
Please note that if you used regular canned frosting as I did, you will want to clear space in your refrigerator to make sure the icing does not get hot and start to melt.
Christmas Bell Photo Ornament
Here is the template and instructions for this weeks coming project.
| christmas_bell_photo_ornament.pdf |
Candy Cane Holder
If you missed our live demo on December 2nd you can watch the recording and still craft along with us. Click below to download the instructions and templates for this project. And follow this link to watch the recording. Happy Crafting!
| candy_cane_holder_p1.pdf |
| candy_cane_holder_p2.pdf |
Treat Gift Jars
Delight the people on your list with a thoughtful handmade gift that will fill their home with the smells of from scratch holiday baking
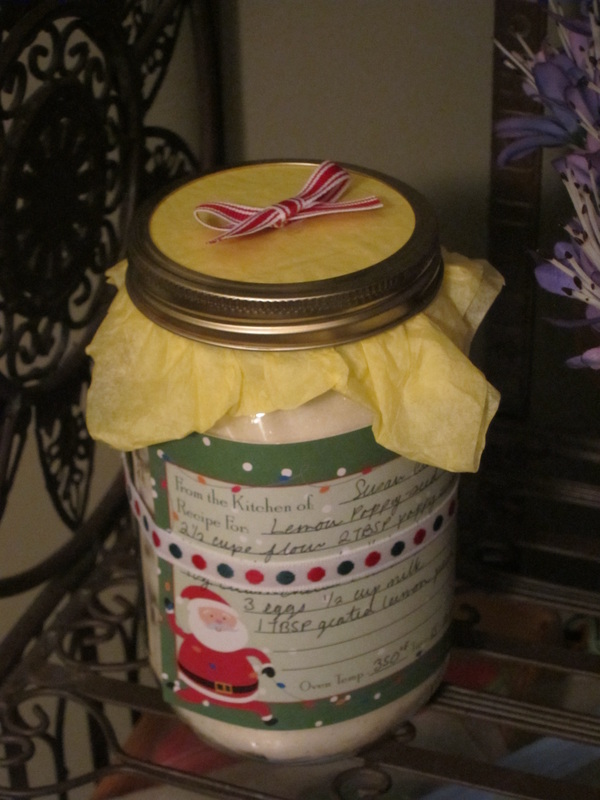
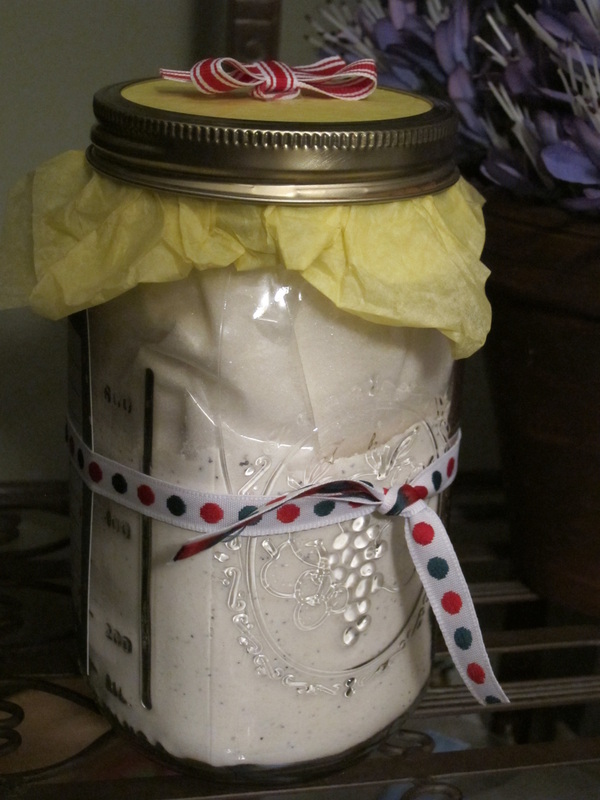
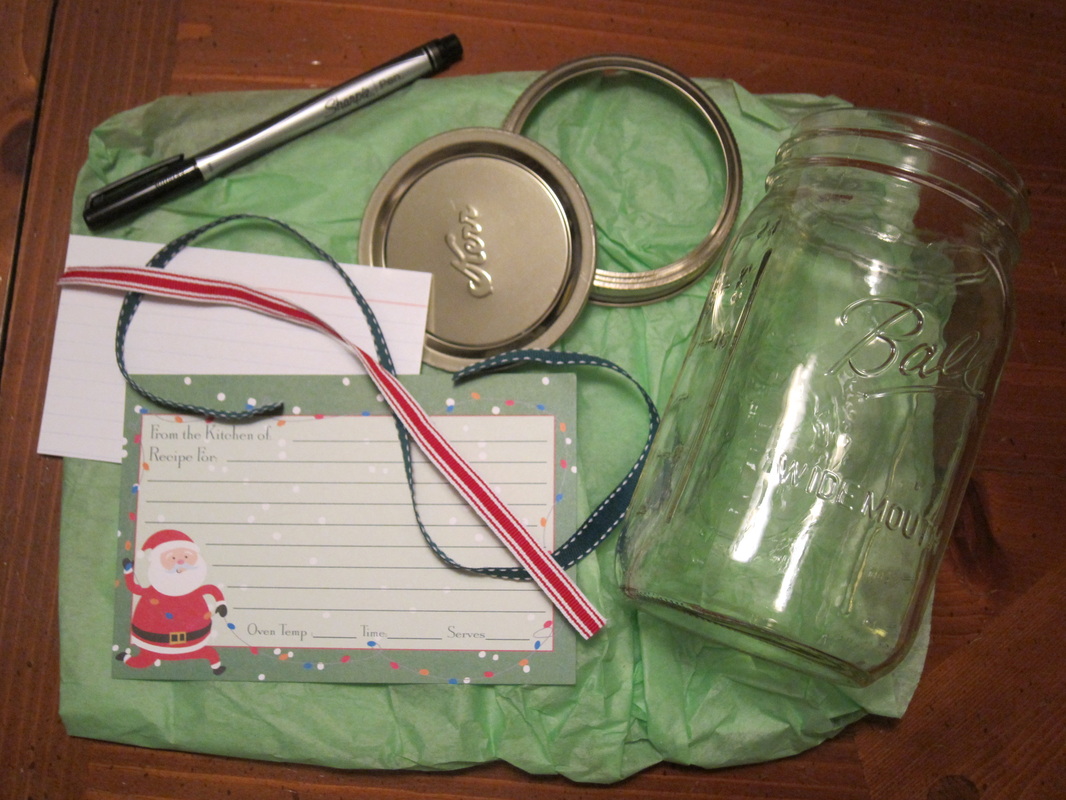
What you will need: 1 quart canning jar with lid and ring, 1 recipie card, 1 3x5 index card, 1 ribbon 18" long, 1 ribbon 9" long, tissue paper, a pen and sissors
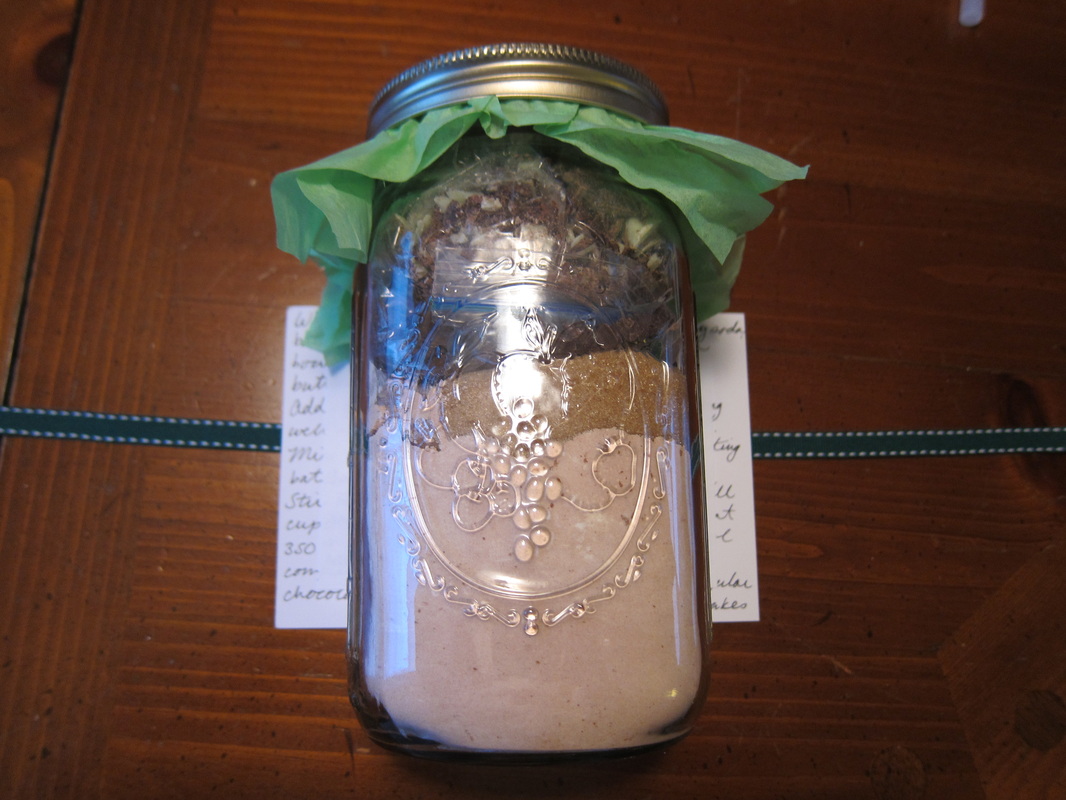
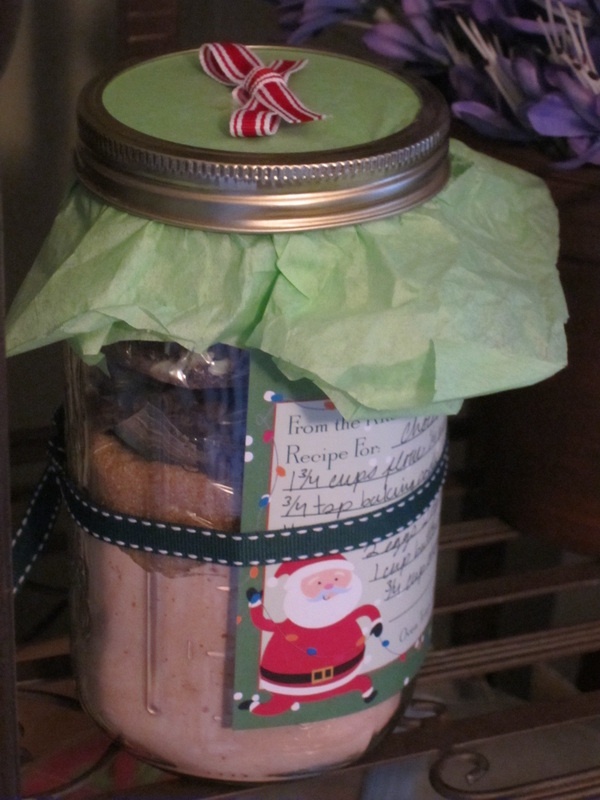
First fill your jar with your favorite recipe ingredients for cookies, cake, soup or bread. You can either fill the jar as ingredients are used in the recipie packing each layer down as the jar fills, or (as I did and shown in the pictures) fill the first part of the jar with the dry ingredients that all get mixed together and if your recipe calls for mixing of other ingredients in stages, add them in layers in individual baggies tied with a twist tie. This will keep the ingredients separate until the necessary step.
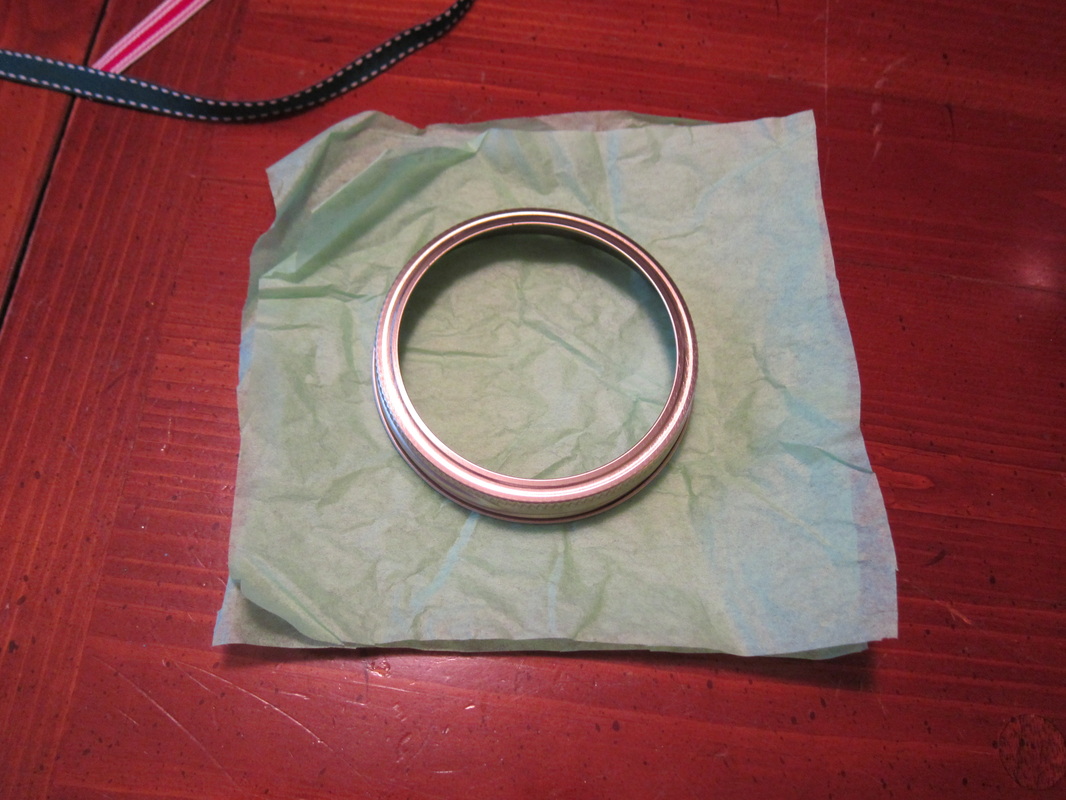
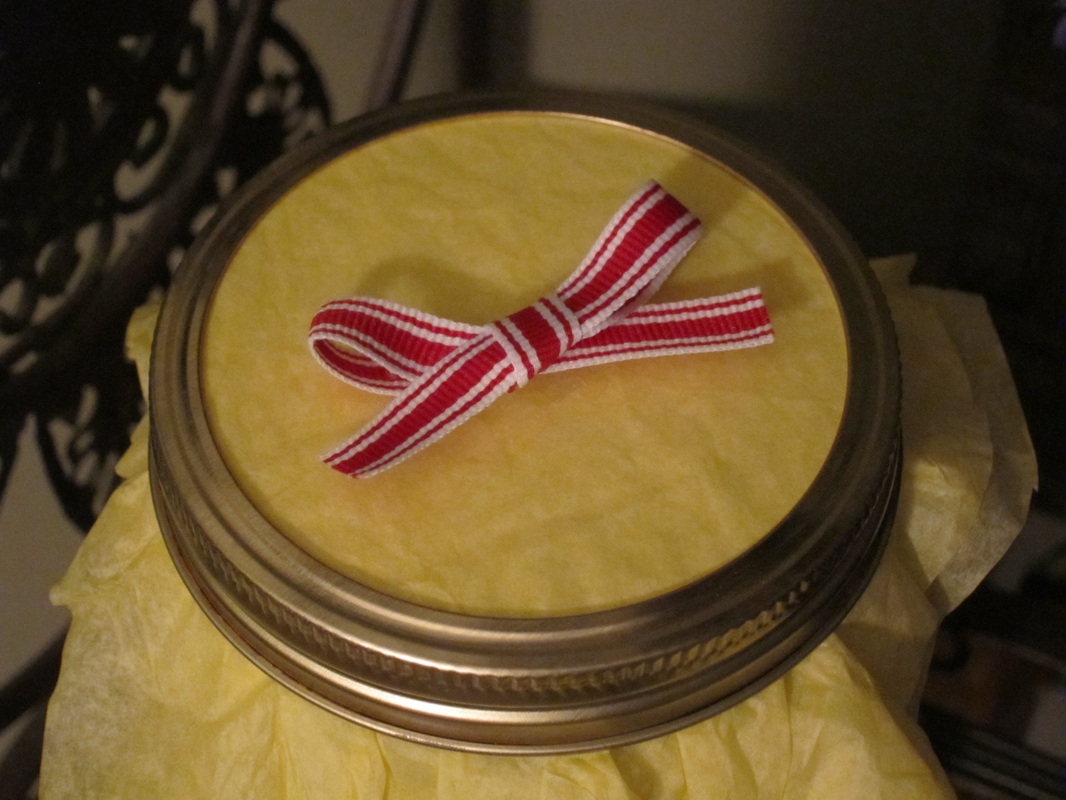
Second take the ring and place it on top of the tissue paper to cut out a reasonable amount to be placed over the lid for decoration. Cut paper to about 2 inches or so beyond the ring in a square (or circle) depending on your preference. Then place the paper over the lid and tighten the ring on top of both to seal the jar closed.
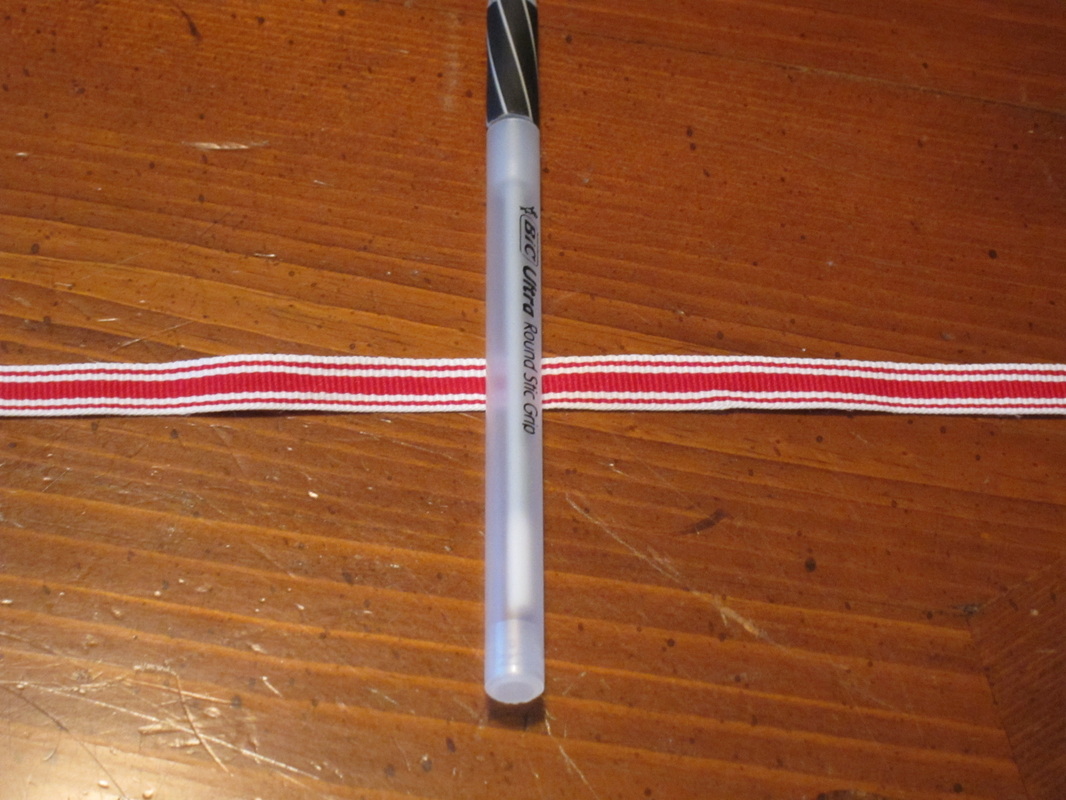
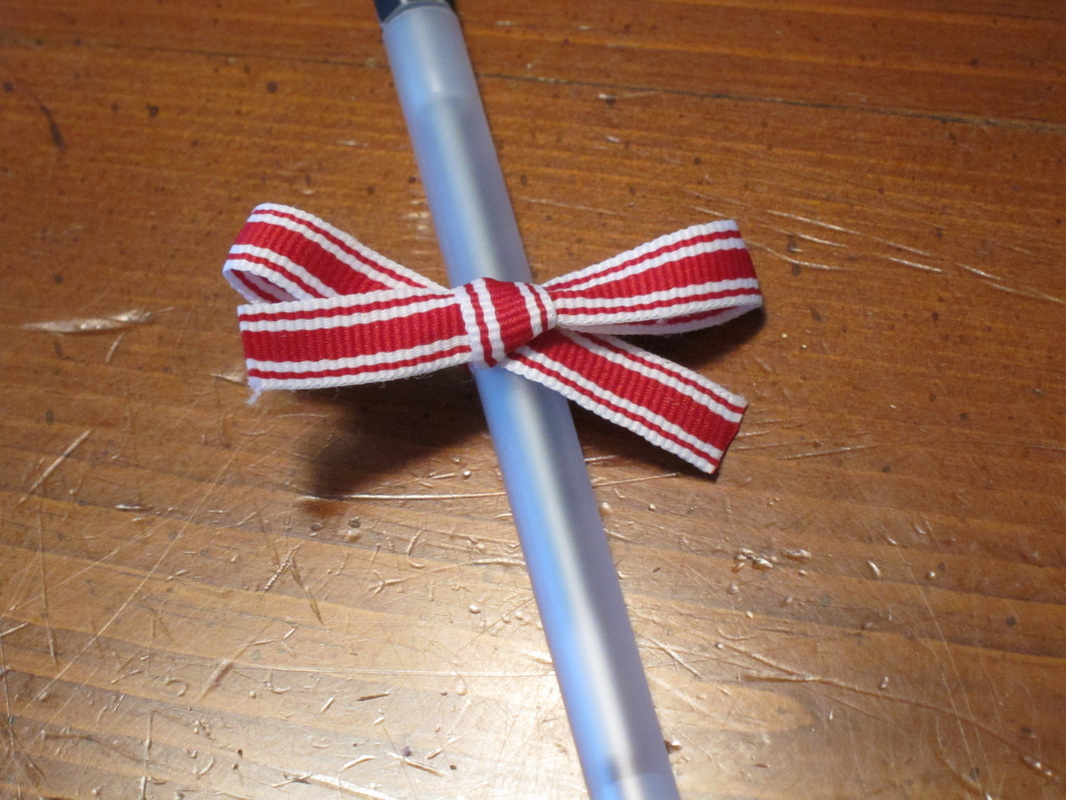
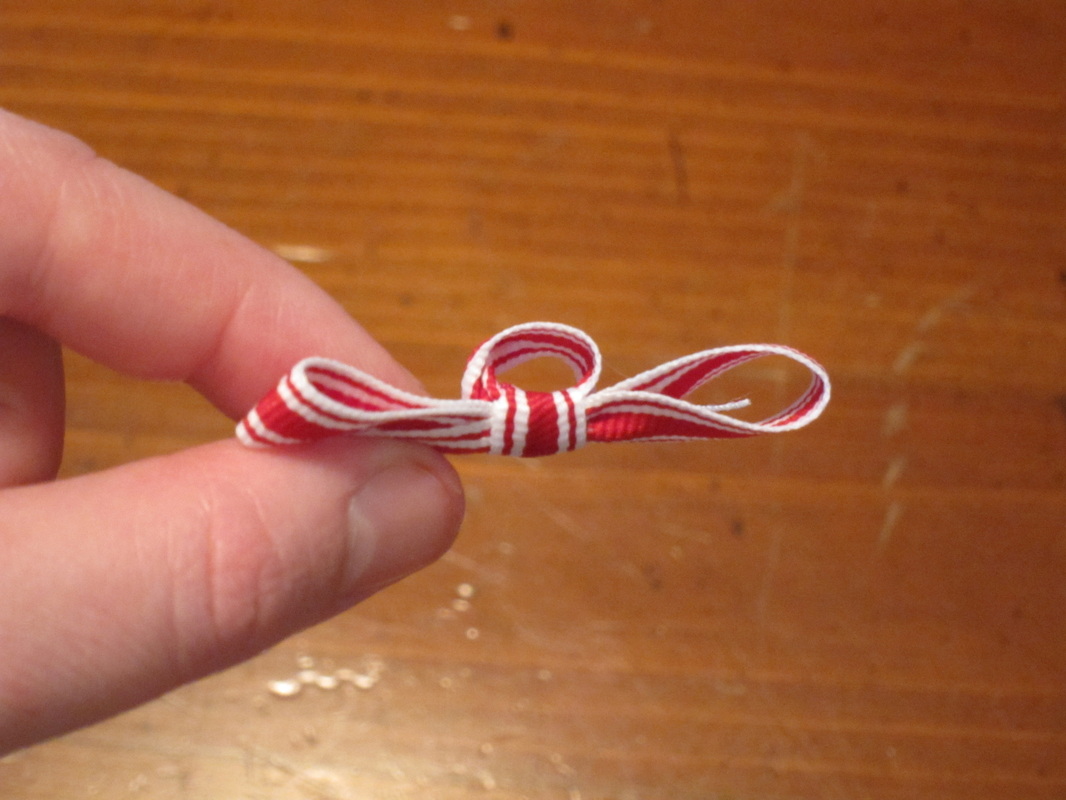
Third use a pen to tie a bow with the 9" ribbon. This will create a loop for you to place a very thin piece of tape through to secure it to the middle top of the jar lid.
Second take the ring and place it on top of the tissue paper to cut out a reasonable amount to be placed over the lid for decoration. Cut paper to about 2 inches or so beyond the ring in a square (or circle) depending on your preference. Then place the paper over the lid and tighten the ring on top of both to seal the jar closed.
Third use a pen to tie a bow with the 9" ribbon. This will create a loop for you to place a very thin piece of tape through to secure it to the middle top of the jar lid.

Fourth write out the complete recipe for your goodie on the recipe card. On the index card make a list for the recipient of the items they may still need to make the treat and what items are included. ((Example: You will need: 2 eggs, 1/2 cup milk Included: flour, sugar, cinnamon))
Fifth place the 18" ribbon down horizontally and lay the recipe card face down and then the index card face down on top of it, centered Then lay the jar side down centered onto of the cards. Use the ribbon to secure the cards to the jar by making a knot
Fifth place the 18" ribbon down horizontally and lay the recipe card face down and then the index card face down on top of it, centered Then lay the jar side down centered onto of the cards. Use the ribbon to secure the cards to the jar by making a knot
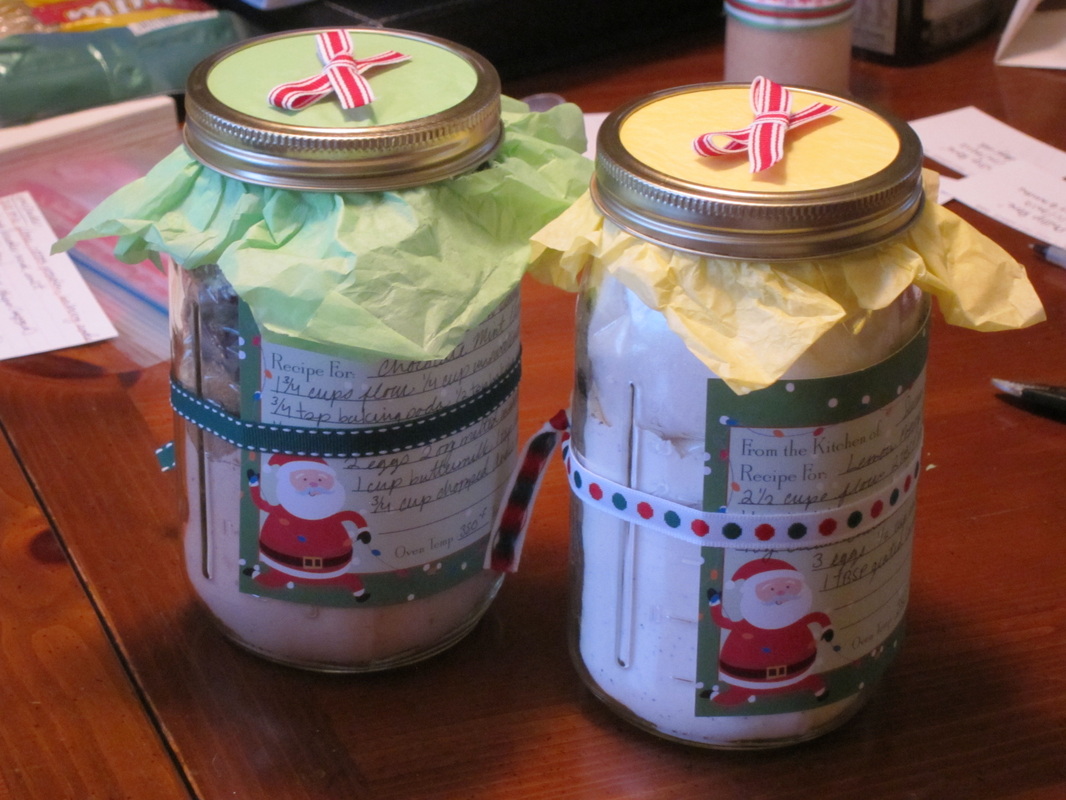
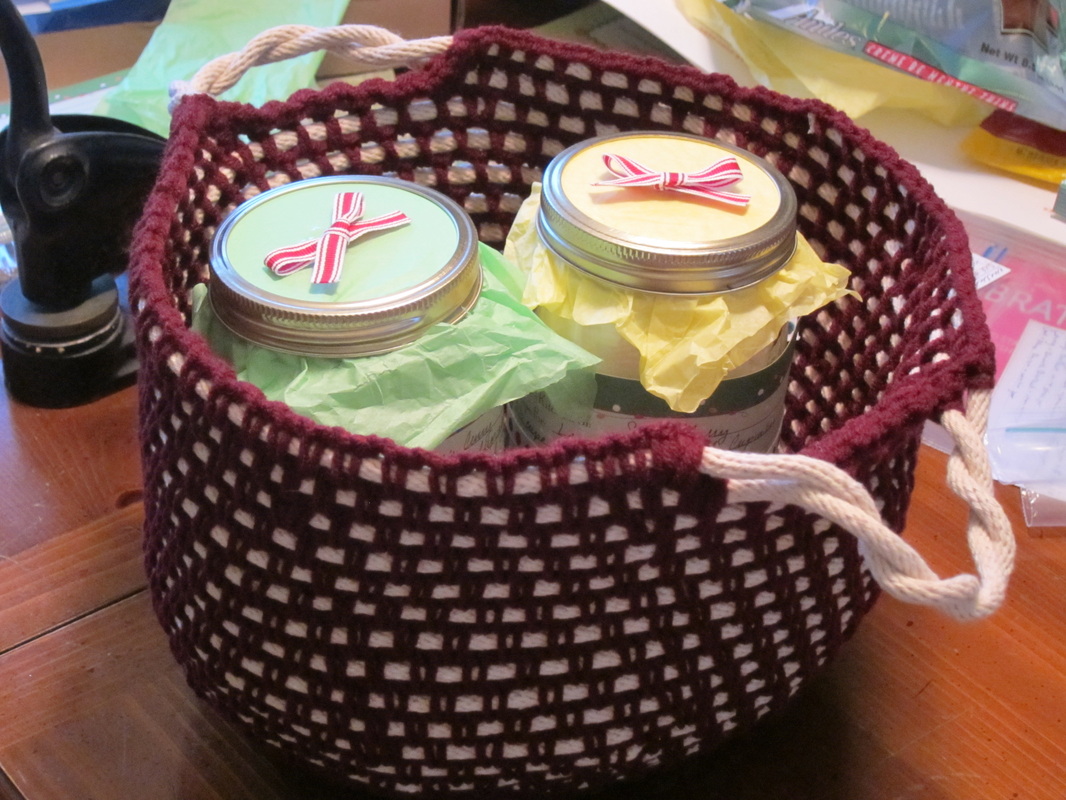
Your jar is now ready to gift. You can also place the jar in another homemade gift for an added touch.
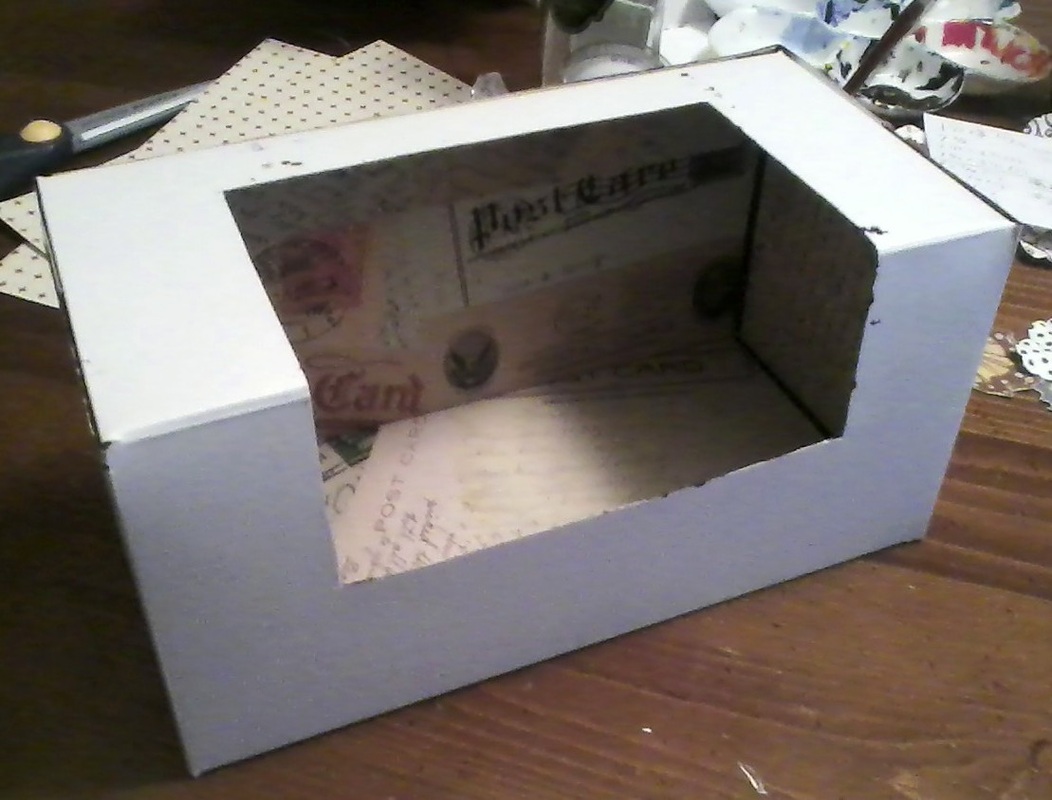
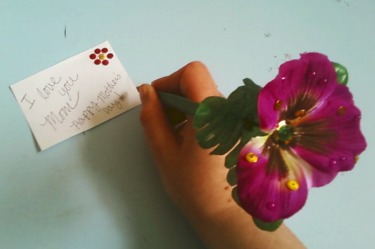
Love Your Notes Mailbox
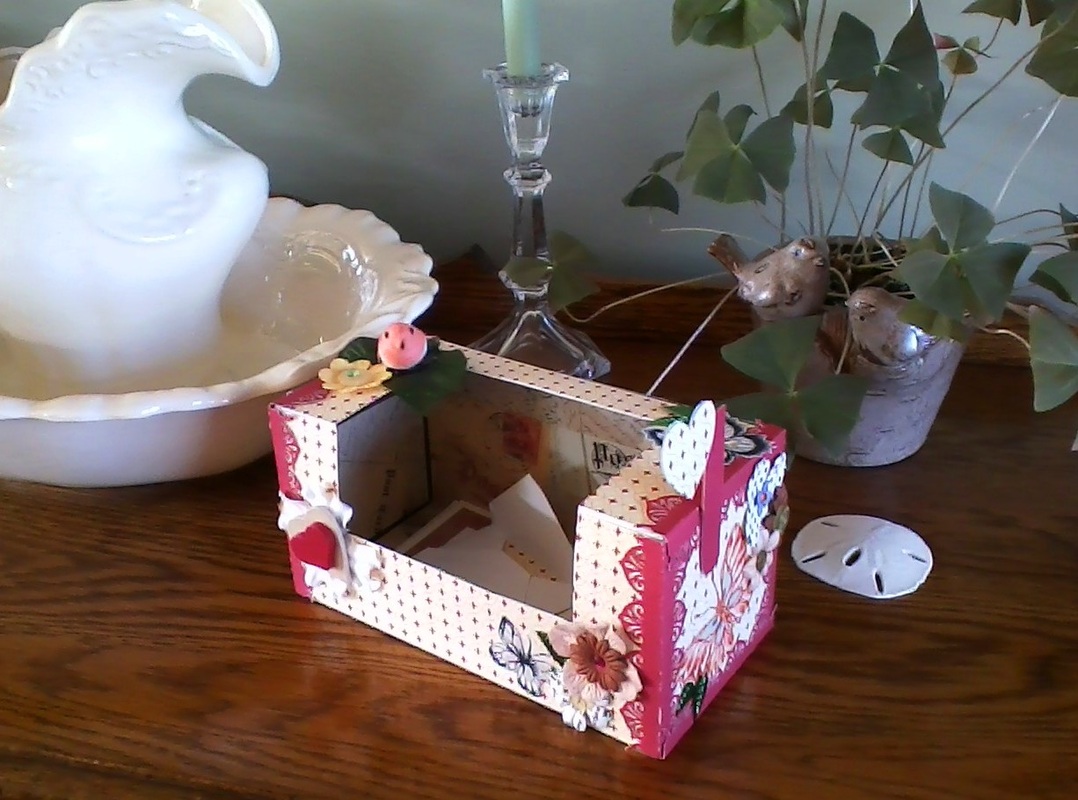
Adult Craft Version Instructions:
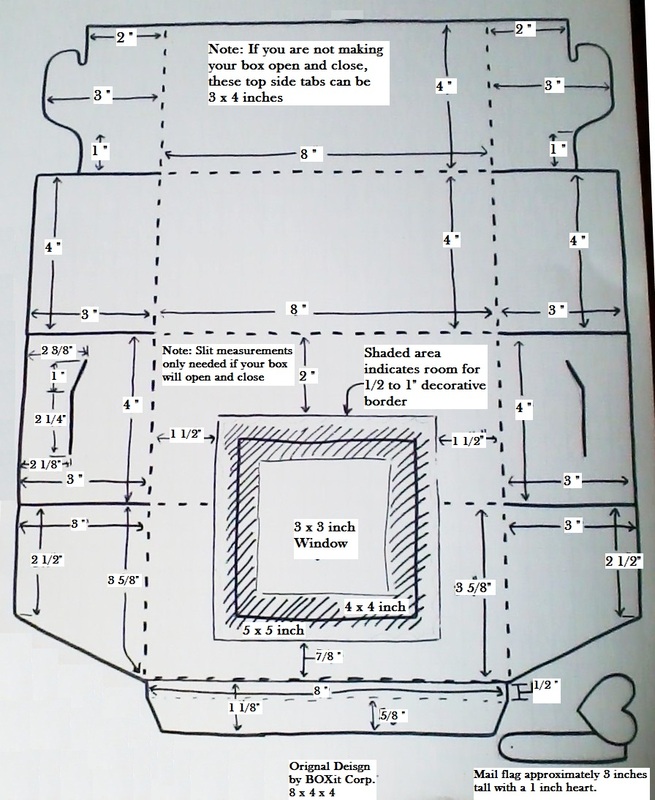
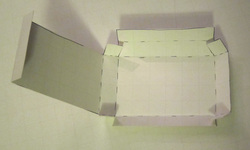
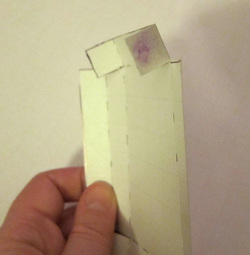
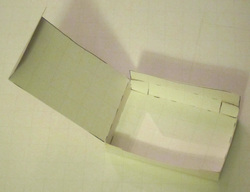
1. On poster board measure and mark the dimensions for folds and cuts for the 8 x 4 x 4 box. Note: The type of border you prefer to have around the window will determine the size you cut your window to. Our mailbox does not have a border and was measured and cut to be a 5 x 5 inch window. You also do not need to cut the tabs and slits unless you would like your mailbox to open and close rather than just having the open window. Original box design by BOXit Corp.
2. Cut out box template and distress along the edges which will or might be visible once assembled. We used brown acrylic paint for ours.
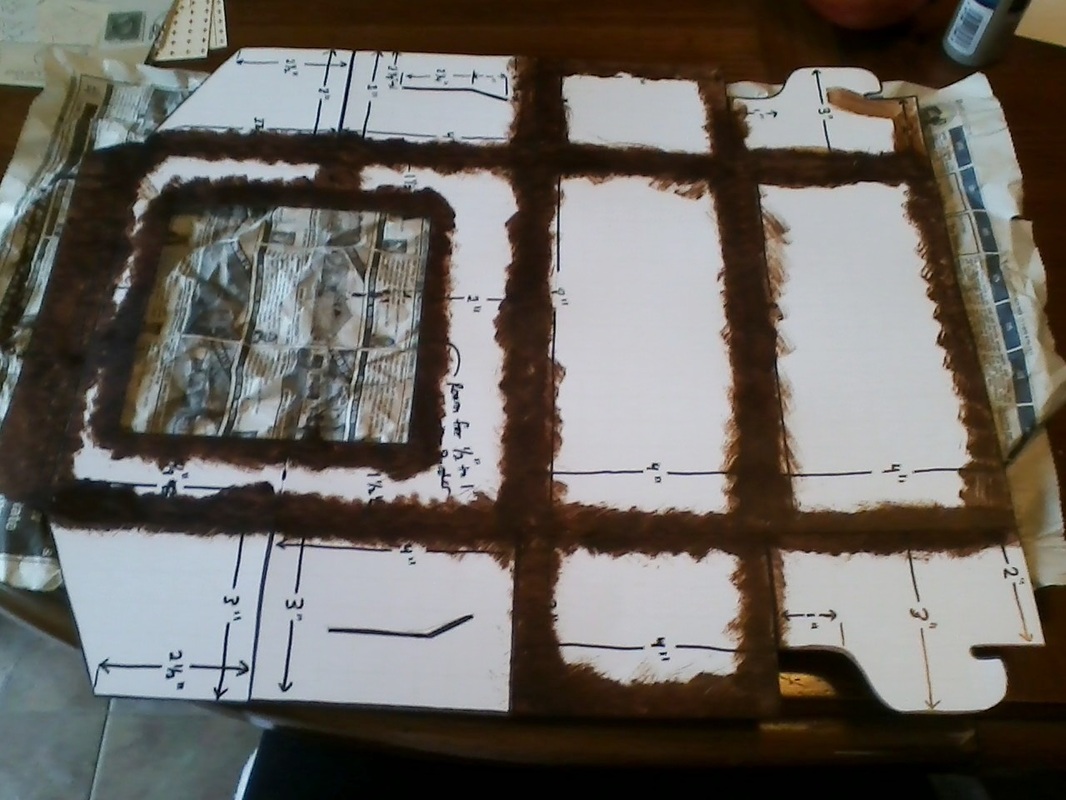
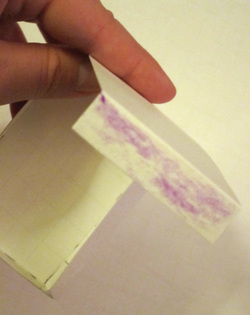
Tip: Completely cover the folding flap and the two side flaps at the top of the window which will not be completely covered by the inside paper lining.
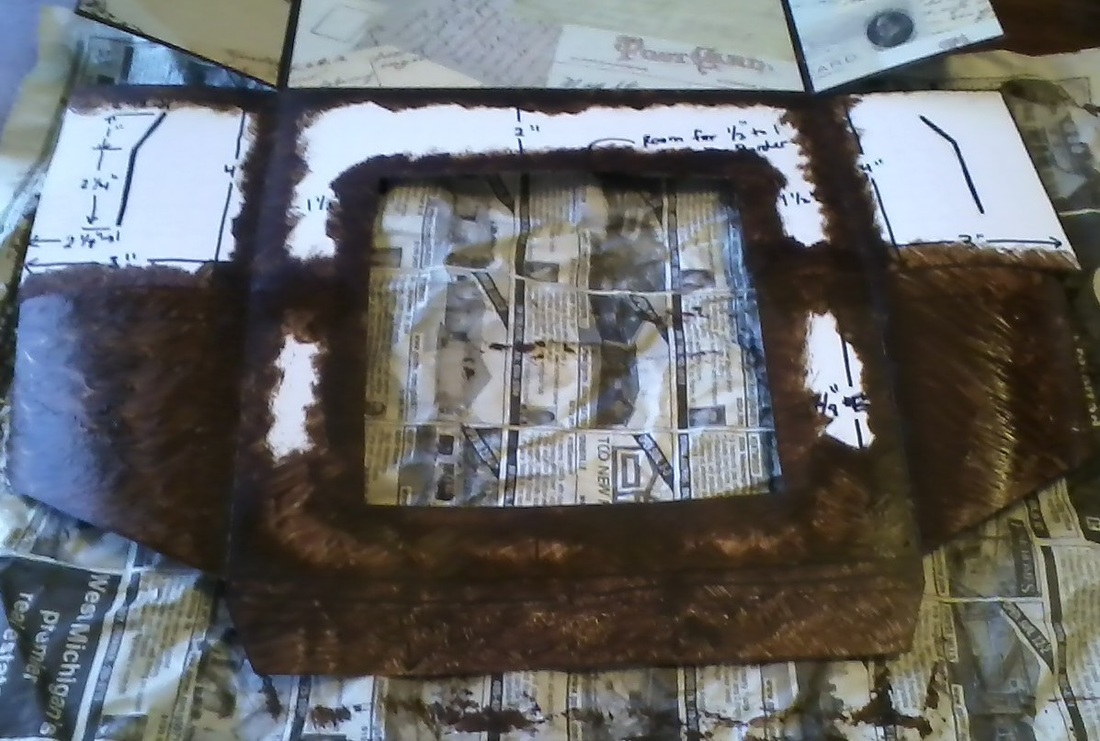
3. Line the inside of the box with paper or cover in another way you choose with paint, ink, etc. Paper sizes you will need are noted on the picture below. For our project we used Garter Studios "Postcards" collection 12 x 12 inch paper.

4. Assemble Box. Be sure to use a sturdy adhesive to hold your box together. We used Scotch double sided tape.
5. Embelish and decorate your mailbox any way you like. We began by lining our box with paper. Cut paper pieces you will need if you choose for the outside of your box are: 2 - 8 x 4 inches
2 - 3 x 4 inches
1 - 8 x 1/4 inch
1 - 8 x 3/4 inch
1 - (U shape piece for front of box) 8" long along bottom of box, 4" wide up sides, 1 1/2" across to window, 2" down sides of window and 5" long along bottom of window.
1 - (U shape piece for top of box) 8" long along top of box, 4" wide down sides, 1 1/2" across to window, 3 " up sides of window and 5" long along top of window.
8 - 2 x 4 inch - for corner boarders around the ends of the box
For the outside of our box we used Deja Views Fair Isle Christmas 12 x 12 inch paper for the background and DCWV Tis the Season 8 x 8 card stock for the borders.
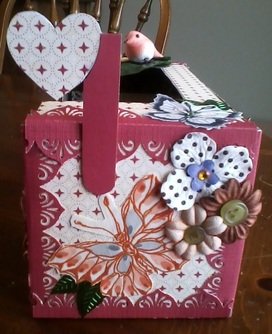
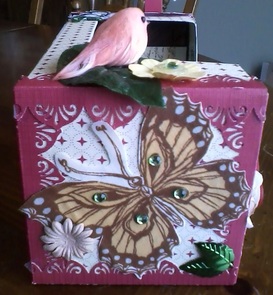
As most will tell you the key to creating a clustered look is layers. First we have the background paper, then the border paper. The flag is set off on its own. The butterfly is next with some leaves tucked under its wing. Then the poka-dot flower has another blue flower and bling layered directly on it. The burgundy flower with an olive green button overlaps just a few petals over the first flower. The dusty peach flower also with a button overlaps both the butterfly and burgundy flower completing the dimensional look.
Although this side used much less overlay of different parts, you can still create a different look by combining the mat finish of the paper, cloth butterfly and flower to the shiny look of the leaves and bling glued to the butterfly.
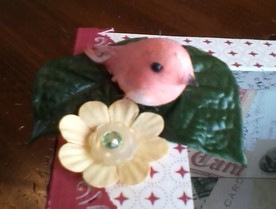
There is a bit more work for this little bird than you can see. First the fabric leaves were lightly glued in place. Then the birds position was determined and two small holes were punched through the leaves and top edge of the box for the wire coming from his feet to go through and secured to the inside of the box. Then the paper flower was placed overlapping the leaves and accented with a button and faux pearl.
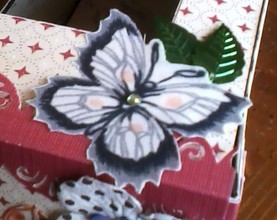
To make this butterfly stand out some more we used a fine point black sharpie marker to accent around the celled part of the wings, the connections to the body and antennae. Then we added a faux pearl to the center of the body to break up the fabric and lead the eye around. And finished by placing some accent leaves under the butterflies edge.
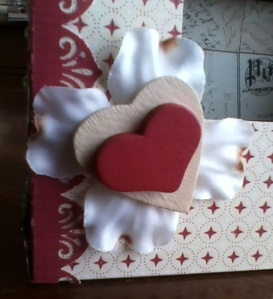
To layer and secure heavier wooden accents to a fabric flower, first secure the flower to the box with a brand by punching a small hole through the flowers center and through where the center lines up with the box, and attach the brand. Next use a liberal amount of wood glue on the back of the large heart and press firmly onto the flower. Using a thin layer of wood glue attach the second wooden heart on top of the first. Set the box on its side until the glue is completely dry.
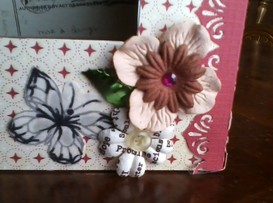
For this last section we did lots of layers again. Beginning with the butterfly - accented again with sharpie marker. Then moving to the script flower with button center. Moving onto the leaf and double layered paper flowers with bling overlapping the leaf and script flower.
But these are just examples of how you can embellish your love notes box. Play with the materials you have and don't forget even the little things - buttons, ribbon, sequins, puzzle pieces... anything can give you that one of a kind treasure look. Enjoy!
But these are just examples of how you can embellish your love notes box. Play with the materials you have and don't forget even the little things - buttons, ribbon, sequins, puzzle pieces... anything can give you that one of a kind treasure look. Enjoy!
Bonus Adult Activity: Growing and Preparing Dried Herbs
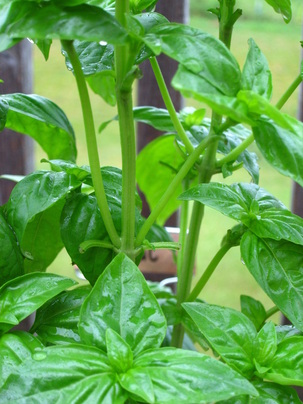
Something everyone enjoys is a tasty homemade meal. They can be even more delicious with fresh herbs from the garden. If you want to start your own herb garden it can be relatively inexpensive. Our herb garden was started from seeds using potting soil and a biodegradable small pots - so that as the plants grew their roots would expand through the pots and you can plant the entire thing into a larger pot when they are big enough. We now have our herbs in 18 inch tall terra cotta pots and filled them 1/3 of the way full with small rocks and 2/3 full with potting soil (since herbs need pots with lots of drainage). Once your herbs are big enough you can prune them and dry the clippings/leaves.
Each herb is pruned slightly differently for each other but in general have the same procedure. As an example this is how you pick and dry basil. Once the older leaves have grown to a good size, about 2 or 3 inches long for basil, you pinch them off (on the leaf stem, not directly next to the plant).
Each herb is pruned slightly differently for each other but in general have the same procedure. As an example this is how you pick and dry basil. Once the older leaves have grown to a good size, about 2 or 3 inches long for basil, you pinch them off (on the leaf stem, not directly next to the plant).
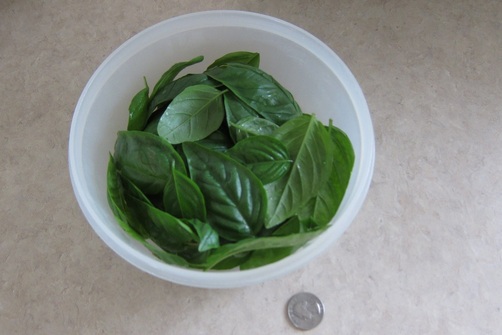
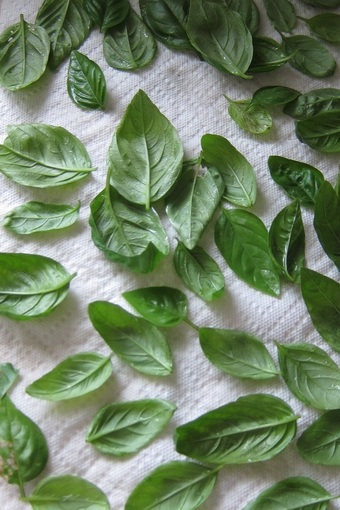
Here is a picture of the basil plant after pruning.
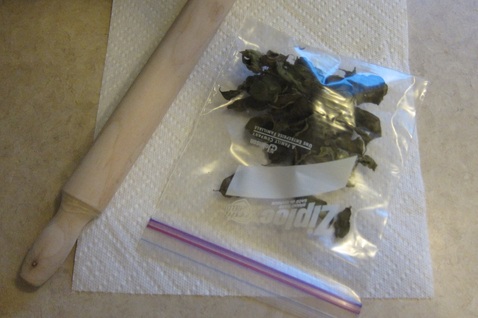
Next wash off the leaves and pat them dry with a paper towel.
Preheat the oven to 200 degrees and arrange the leaves on a lipped cookie sheet.
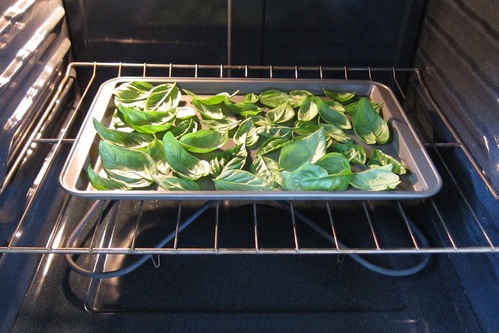
Check on the leaves every 15 minutes. Once they are completely dried, remove the sheet from the oven to cool.
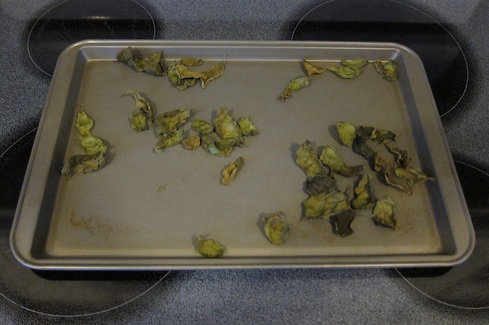
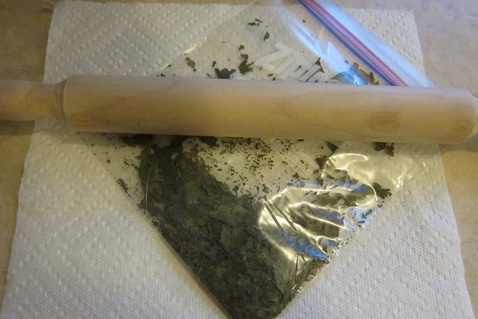
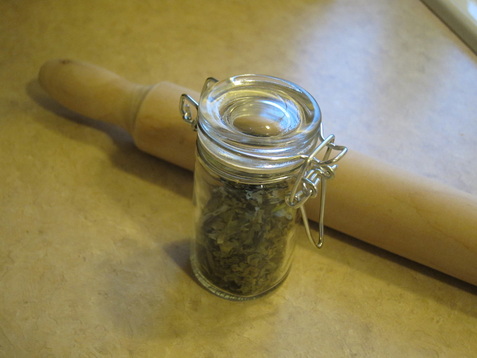
Next crush the leaves by placing them in a ziplock bag sandwiched in paper towels and roll over the bag with a rolling pin. Once finely crushed pour the herb into an air tight container. Then enjoy in your next meal.
Home Baked Ornaments
Recipe
Ingredients: 3/4 cup of applesauce and 4.12 oz ground cinnamon (or 1 bottle of ground cinnamon), also need 1 straw and ribbon
Mix ingredients together in a medium bowl into a dough. Kneed and roll out dough until about 1/4 inch thick. Use your favorite holiday cookie cutters to cut out the ornament shapes. Use the straw to create a hole at the top of the ornament. Lay ornaments out to dry on a wire rack. Let dry for at least 1 hour. Once hard cut the ribbon into 3 inch long pieces. String the ribbon through the dry ornaments and tie a knot to create a loop. Then hang up and enjoy!
Christmas Celebration Banner
Here is the template for the celebration Banner. Feel free to download the template, color or paint, link together with the words to one another or with construction paper stars in between each letter and hang up. The Christmas tree is designed to go between the Y and C and the reindeer may be placed at the beginning or end of the greeting. Enjoy!
| christmas_celebration_banner_page_1.docx |
| christmas_celebration_banner_page_2.docx |
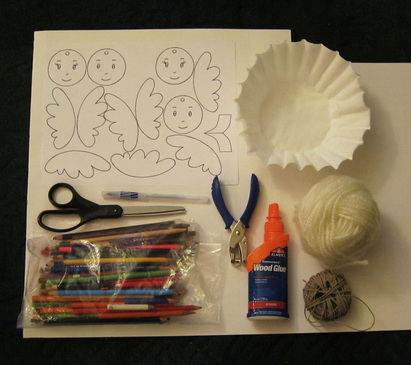
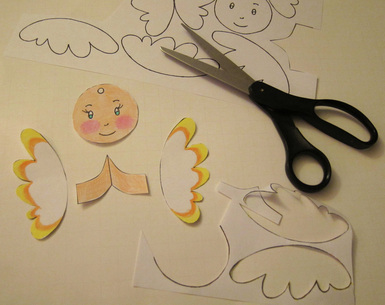
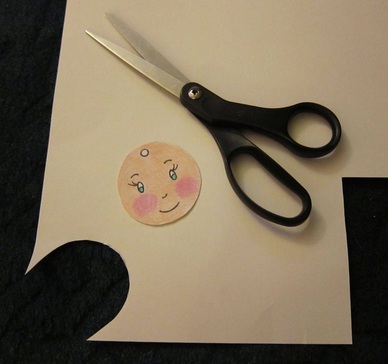
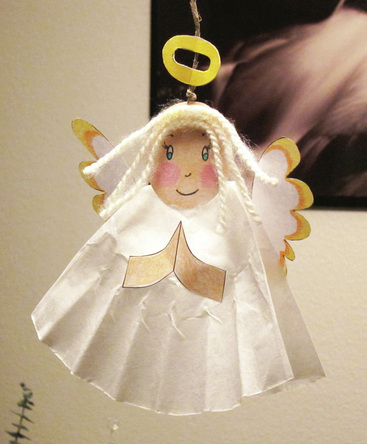
My Own Angel
Step 1: Print template
| my_own_angel_template.pdf |
Step 2: Gather materials
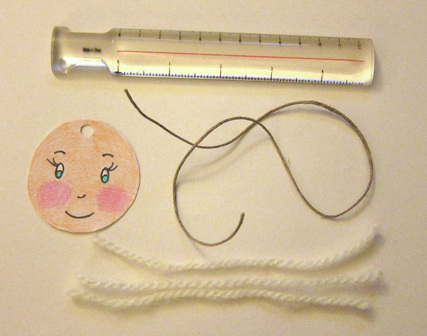
For this project you will need poster board, color pencils, pencil sharpener, string, yarn, hole punch, pen or pencil, scissors, glue and a coffee filter.
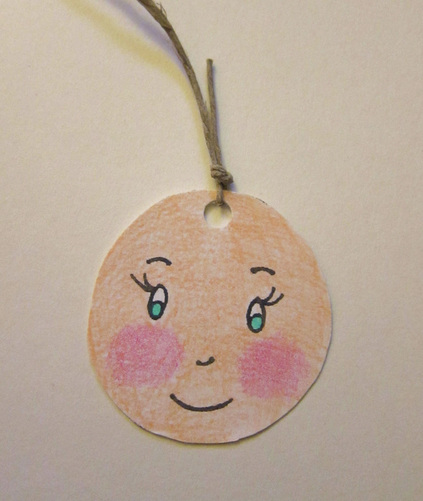
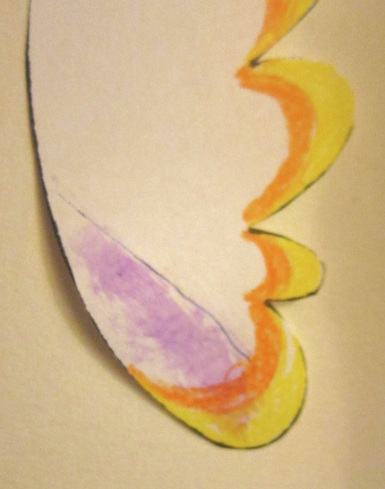
Step 3: Color face and wings
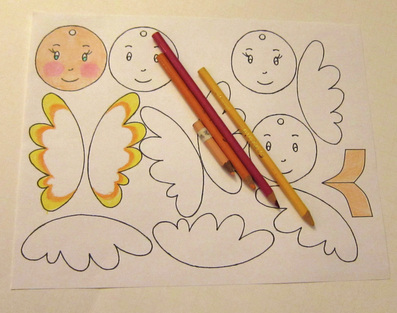
Step 4: Make praying hands using template and color
Cut the praying hands out of the template, trace onto poster board or white paper and color. (Since I was only making one angle I simply colored the template of the hands)
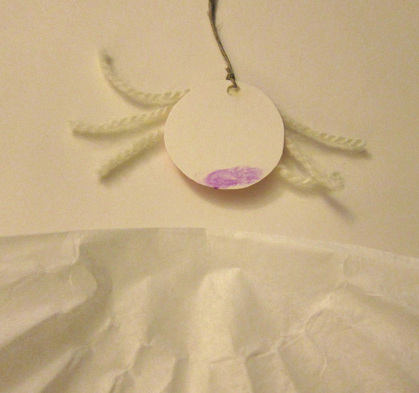
Step 5: Cut out face, wings and hands
Step 6: Glue face onto poster board and cut out.

Step 7: Punch a hole over the circle marked at the top of the face

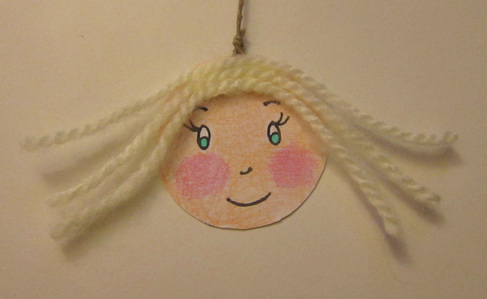
Step 8: Cut yarn for hair
For long hair cut each piece of yarn at least 5 inches long. For short hair cut each piece to only 3 inches long.
Step 9: Cut string
We recommend cutting the string around 9 inches long.
Step 10: Loop string through hole and tie a knot.
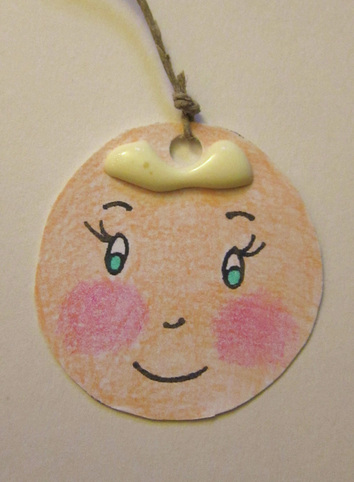
Step 11: Glue hair in place to hide hole.
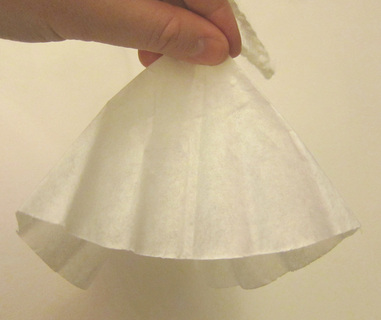
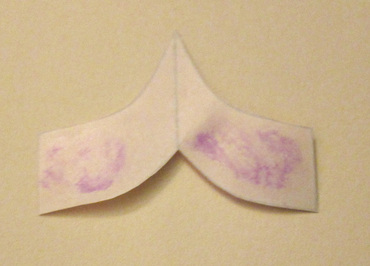
Step 12: Fold coffee filter in half
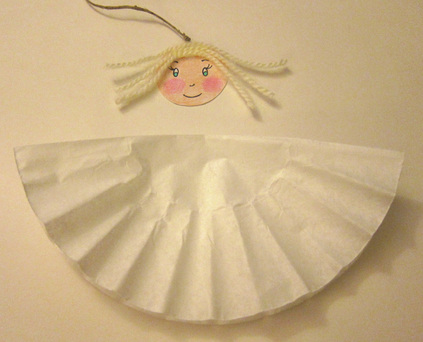
Step 13: Glue face to coffee filter

Step 14: Fold filter
To fold the filter, create an inward pointing accordion fold between the front and back of the angle.
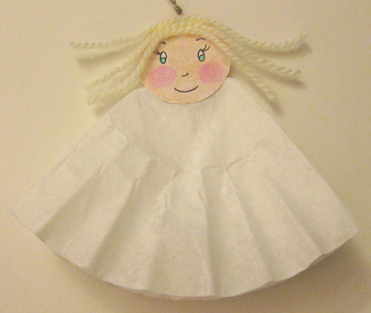
Step 15: Glue hands to front of angel
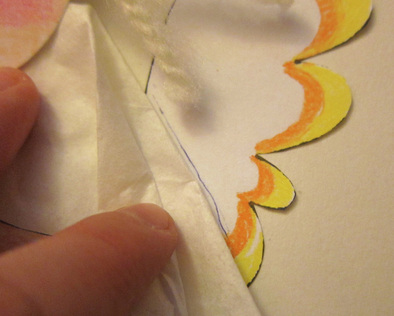
Step 16: Glue wings to back of angel
Place the angle face up and tuck the wings under the angle to see where you would like them placed. Then lightly trace the overlapped area on the wing with the pen or pencil. Glue overlapped space to back of angel.
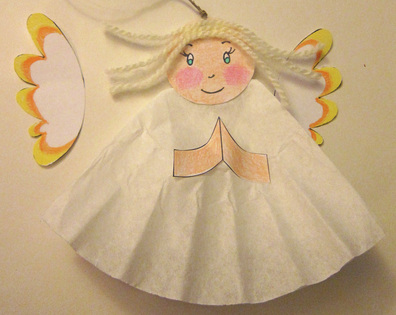
Step 17: Make a halo
Lightly sketch a halo onto the poster board and color in. Then cut out. To cut out the center, fold the halo in half and then cut out a half circle/oval.
Step 18: Glue halo to string
Step 19: Let dry! This may take up to 7 mins depending on the amount of glue used.
Step 20: Hang up and enjoy!
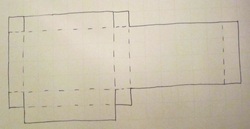
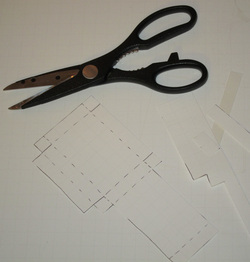
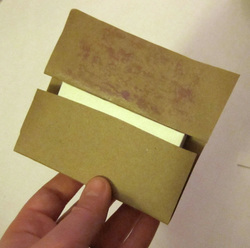
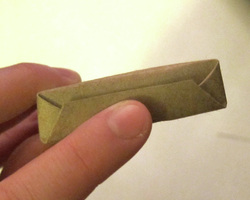
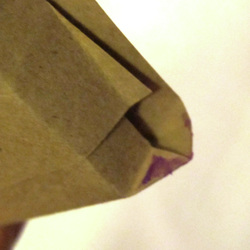
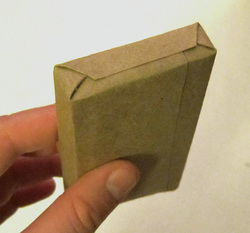
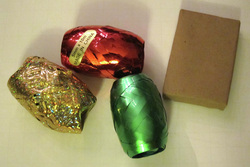
Paper Package Ornament
Step 1: Print template
| paper_package_orniment_template.pdf |
Step 2: Gather materials
For this project all you need is poster board, scissors, glue, ribbon and craft paper/shipping paper (or other paper of your choice). I always have something to write with just in case.
Step 3: Cut out template and glue to poster board
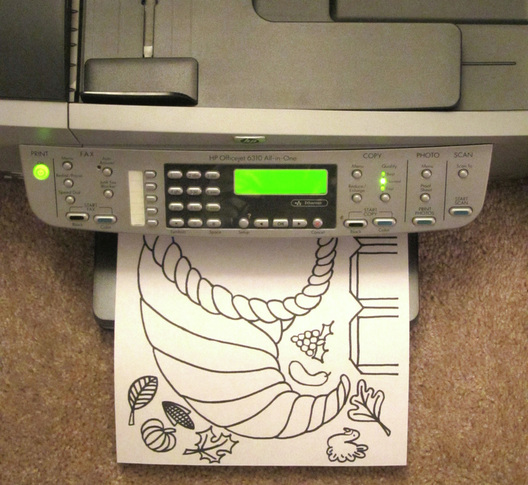
Our printer decided to not work with my computer last night, so I ended up just drawing out the box design on the poster board itself. You are welcome to do this if you would prefer. The front and back of the box are 2 x 3", the sides are 1/2 x 3" and the top and bottom are 1/2 x 2".
Step 4: Cut out box design
Step 5: Score fold all of the parts of the box.
Step 6: Glue tabs off of top and bottom into place.
Step 7: Glue top into place.
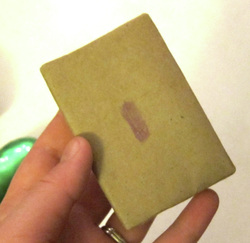
Step 8: Cut a piece of paper big enough to wrap the box.
Step 9: Glue front of box onto the middle of the paper.
Step 10: Glue paper to sides of box
Step 11: Glue paper to back of box.
Step 12: Fold end into place same style as wrapping a gift package
Step 13: Glue end into place.
Step 14: Pick which ribbon you would like to use.
Step 15: Cut lengthwise ribbon so that it overlaps slightly.
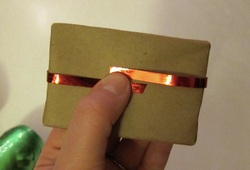
Step 16: Glue ribbon into place.
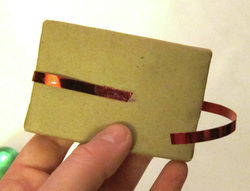
Step 17: Cut width-wise ribbon. Be sure to cut long enough to tie a bow.
Step 18: Tie a bow
Step 19: Place on tree and enjoy!
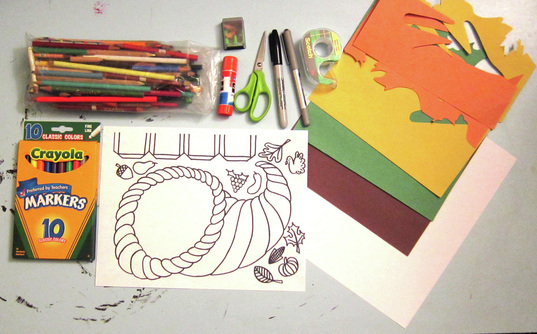
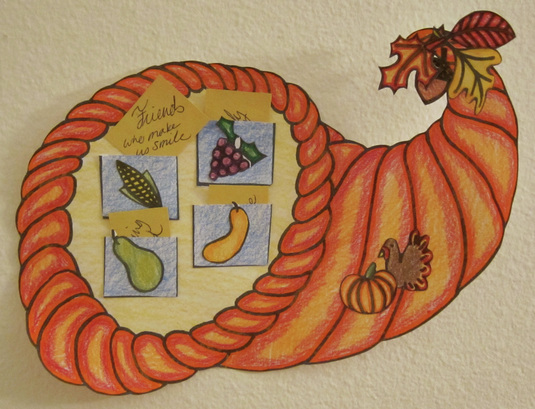
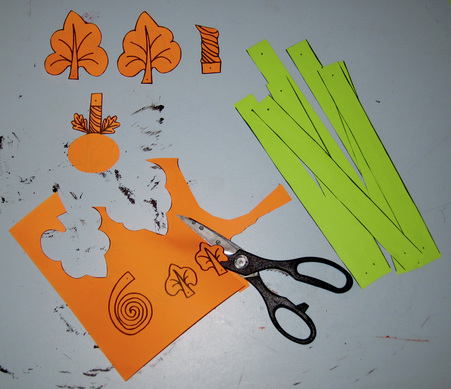
Cornucopia of Thanks
Step 1: Print Template
| cornucopia_of_thanks.pdf |
Step 2: Gather supplies
For this project you will need: markers, color pencils, pencil sharpener, tape, glue, scissors, and scrap consturction or other paper.
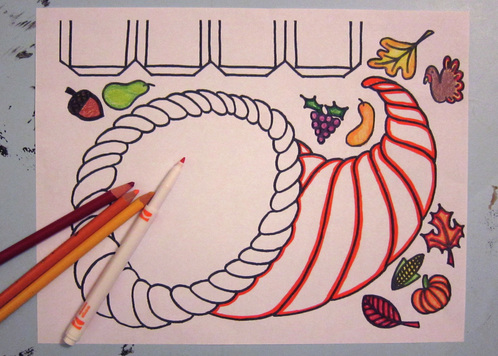
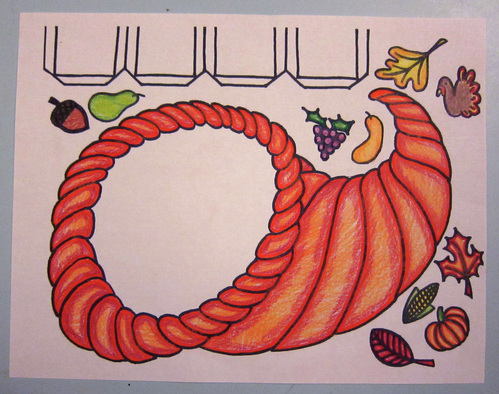
Step 3: Color in the cornucopia, embelishments and pockets
To make the shaded effect we have on our cornucopia, use orange marker around the inside edge of each piece, then add a red border inside the orange marker with color pencil, and finally color in the remaining space with orange color pencil and highlight with golden yellow.

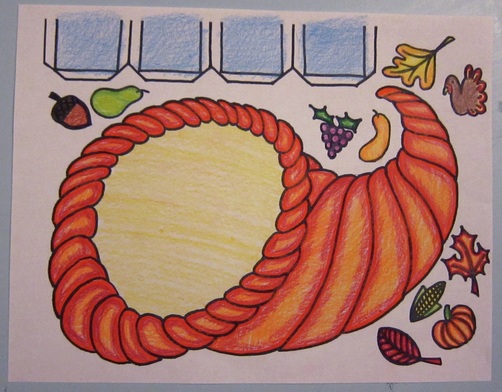
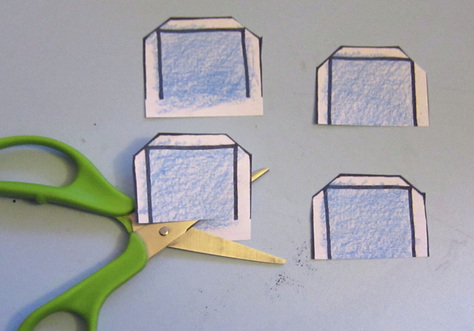
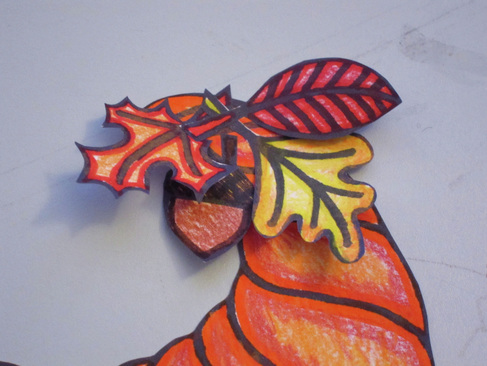
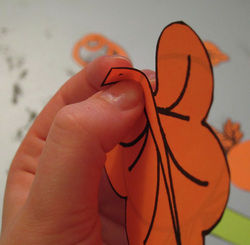
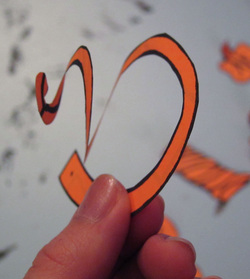
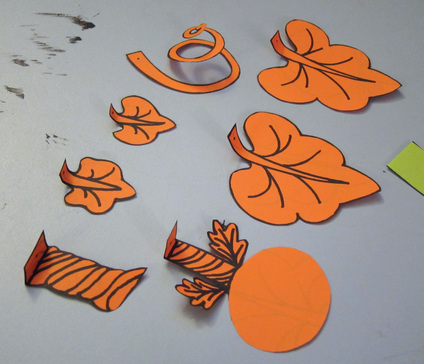
Step 4: Cut out cornucopia and embelishments

Step 5: Cut out pockets
Cut the pockets apart from each other by cutting between the small flaps on each side of the pocket. Then trim the excess paper away from the three flaps for each pocket. Finally trim the "top" (the side with no flap) so that it is even across the top of the pocket.
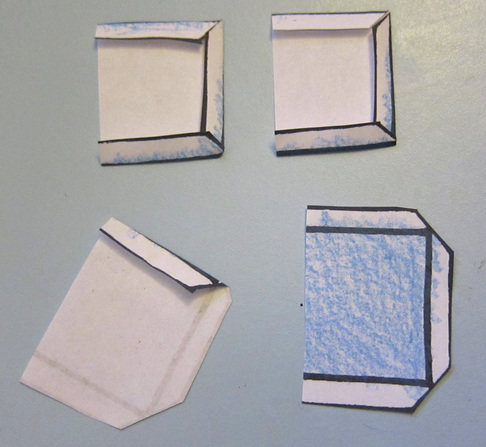
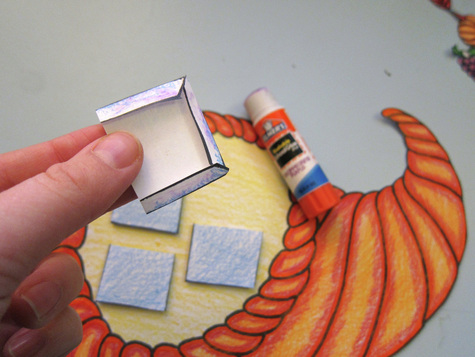
Step 6: Attach pockets
To attach the pockets, first fold the flaps so that around to the back of the pocket. When all three flaps are folded correctly they will form a "U" shape on the back side of the pocket. Second, figure out where you would like them to be placed inside the opening of the cornucopia. Third, apply glue to the flaps and smooth down to hold in place.
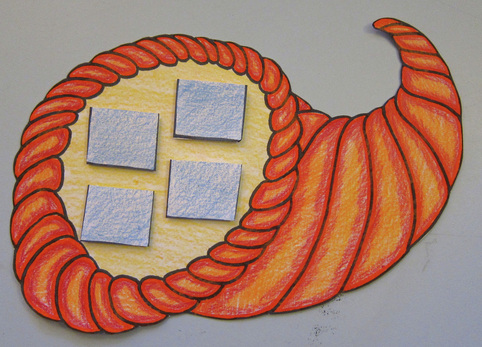
Step 7: Place embelishments
Have everyone pick an embellishment for their pocket and glue it to the front of their pocket. Then if some remain decide where you would like to put them and glue them on.
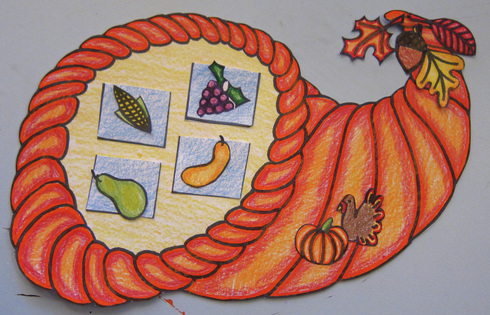
Step 8: Make tags for the pockets
Each pocket will need its own tag. We recommend a tag size of 1 inch by 2 inches. Cut the tag from the scrap paper you have. You can color and decorate your tag anyway you wish.
Step 9: What are you thankful for?
Everyone now takes time to write on their tag what they are thankful for this year. If you need more room, you can always make another tag for your pocket. Talk about the different things everyone is greatful to have and give thanks for those things.
Step 10: Hang up and enjoy!
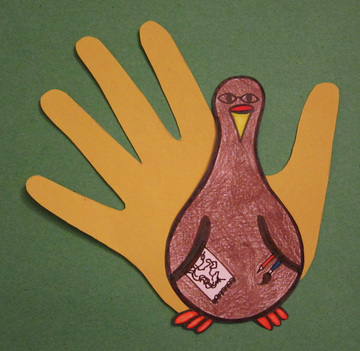
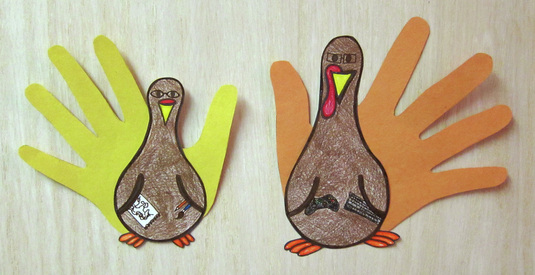
Turkey Family

Step 1: Print template
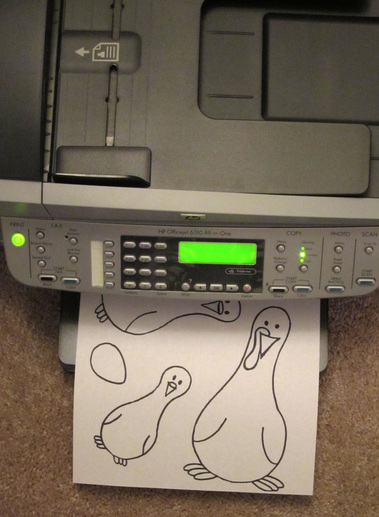
| turkey_family_template.pdf |
Step 2: Gather materials
For this craft you will need: markers, color pencils, crayons, scissors, glue, tape, yellow/gold, green, brown and red construction paper. You may also need a pencil sharpener if you would like to use color pencils.
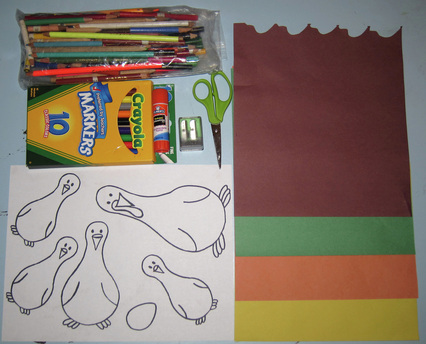
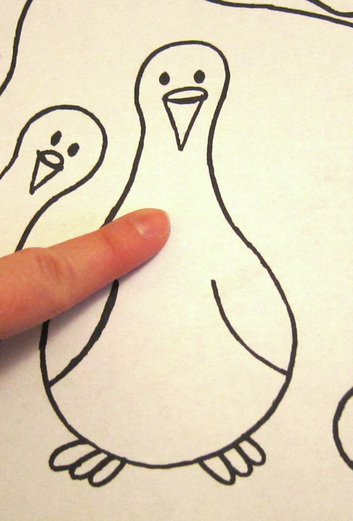
Step 3: Pick your turkey
You will see that our turkey family has several "family members" on it. Which one are you? Let each member pick their turkey. Families who have more members or have more adults, will need to print more than one template for everyone to pick their turkey. The turkey family members are "sized" to approximate the size tail your hand print can make.
Step 4: Decorate your turkey
To make this step easier, cut the template into larger pieces leaving space around the turkey body and pass out to everyone making a turkey. Now color, decorate or embellish your turkey however you like. You can even add accessories to your turkey to make it more like you - add glasses, necklaces, a purse, a tie, whatever you like.
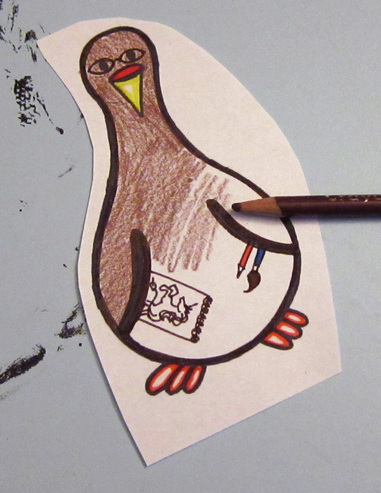
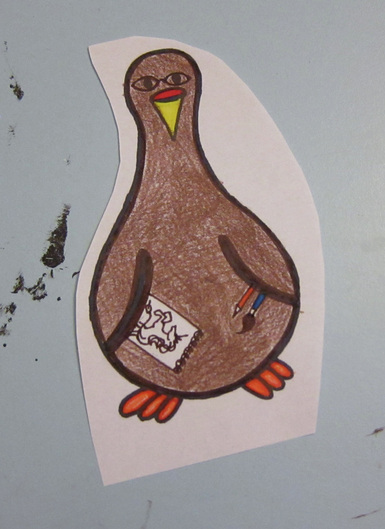
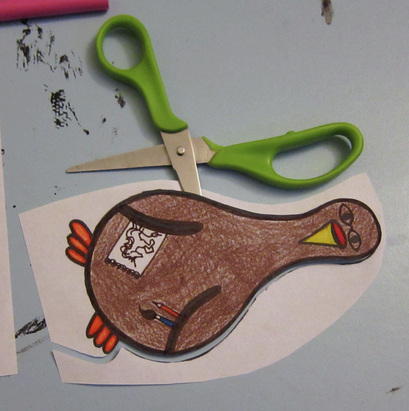
Step 5: Cut out your turkey
Cut out your turkey. You may need to add some of the accessories after it is cut out. Such as a purse.
Step 6: Pick you color of construction paper
Step 7: Trace your hand on the paper
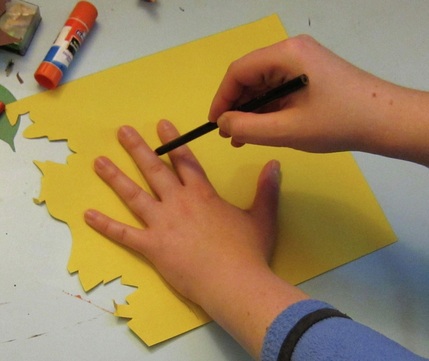
Step 8: Cut our your hand

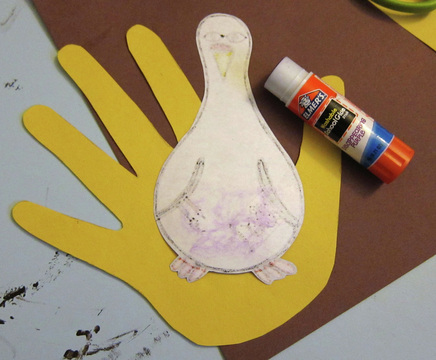
Step 9: Attach your hand
Add your hand to the back of your turkey as their "tail feathers".
Step 10: Hang up your family together and enjoy!
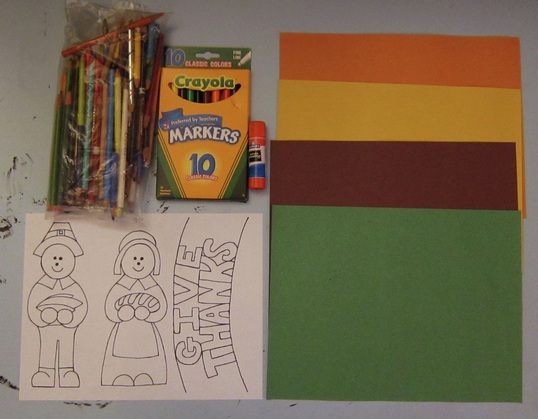
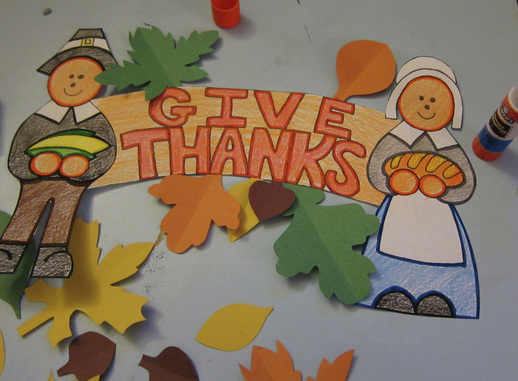
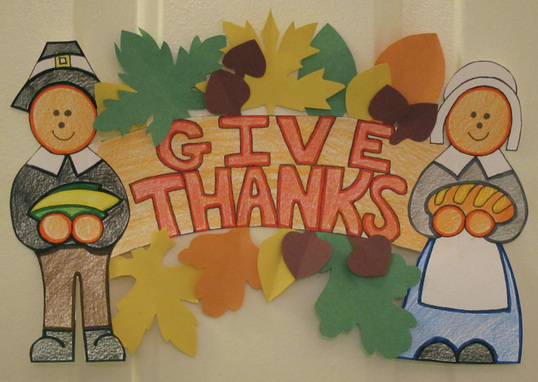
Give Thanks Mini Celebration Banner

Step 1: Print template
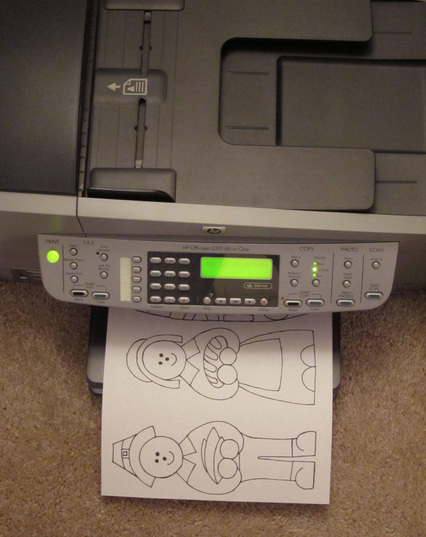
| give_thanks_celebration_banner.pdf |
Step 2: Gather Materials
For this project you will need green, orange, yellow/gold and brown construction paper, color pencils, markers and/or crayons, glue, scissors, and a pencil sharpener (if using color pencils).
Step 3: Color the pilgrims
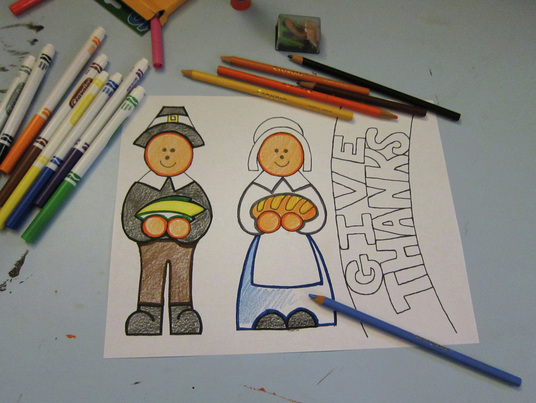
Step 4: Color greeting phrase
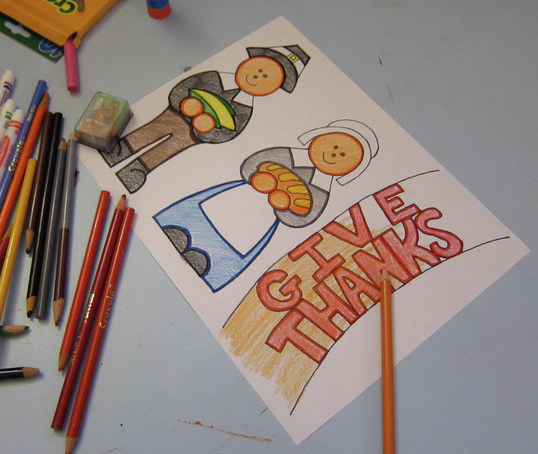
Step 5: Cut out pilgrims and greeting
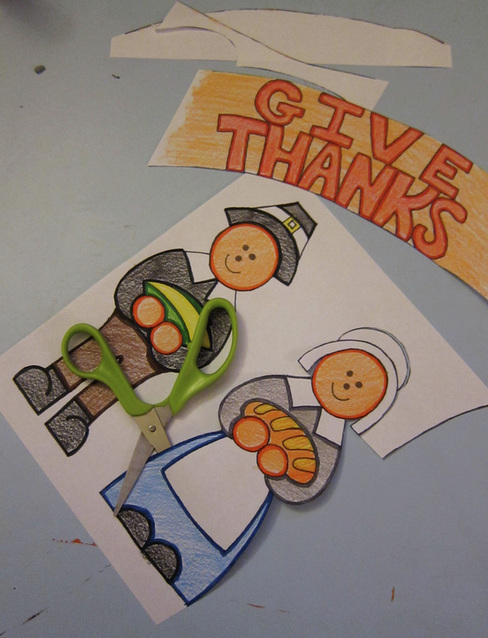
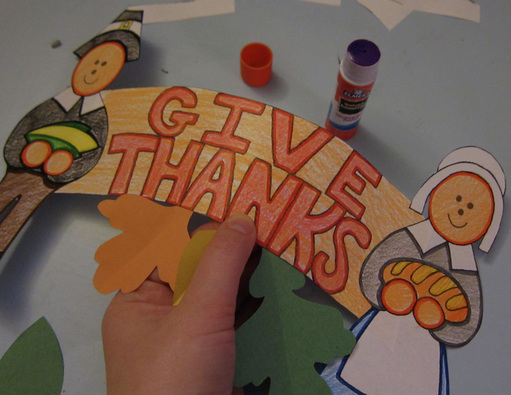
Step 6: Line up the banner
Line up the banner parts so that the pilgrims overlap the greeting slightly. Then carefully turn over and trace where the banner overlaps on the back of the pilgrims.
Step 7: Glue banner together
Glue on the inside of the trace marks. Then re-align the edge o the banner and smooth down.
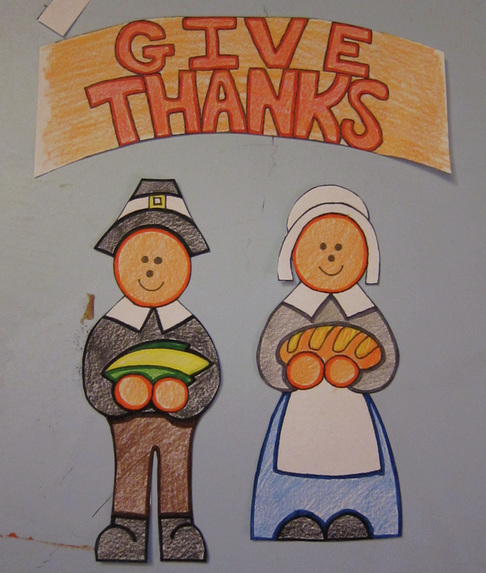
Step 8: Fold the construction paper
Fold one end of the construction paper up about 1 1/2 inches. Do this for each color.
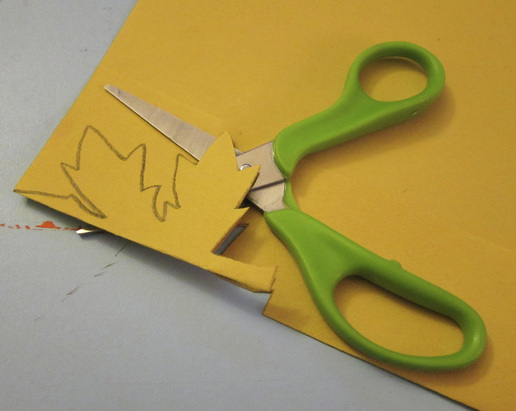
Step 9: Create leaves
Cut our leaf and acorn shapes using the fold for the center. If you would like, you can draw out your leaf before hand to make more compltex shapes. Cut out a variety of leaf shapes and colors.
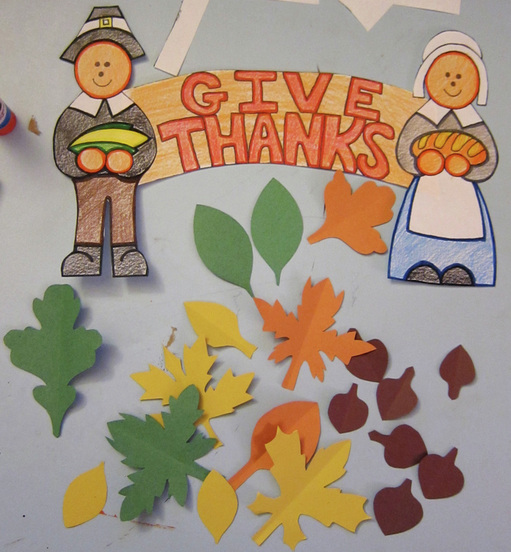
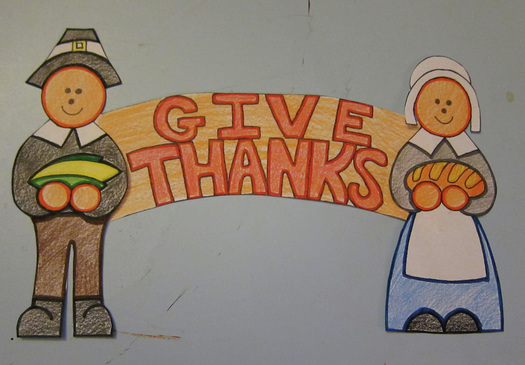
Step 10: Attach your leaves and acorns
To attach your leaves and acorns, place a small amount of glue on the stem and glue in place so that the majority of the piece shows out from behind the banner. You can place them anywhere you wish. My leaves are focused around the greeting. Once they are all attached, let your project dry for a few minutes.
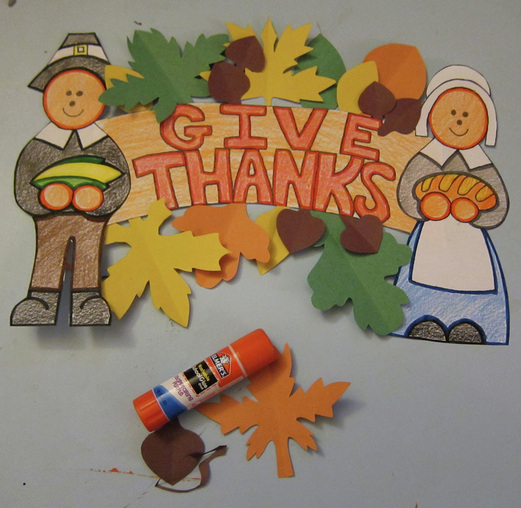
Step 11: Hang up and enjoy!
Pumpkin Inside A Pumpkin

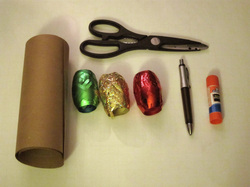
Step 1: Gather materials
For this craft you will need: printing paper, I used green and orange, scissors, markers, a pen and thumbtacks (paper fasteners). You may also wish to use glue instead of the fastener. If you would like to hang your pumpkins, you will want a piece of ribbon about 9 inches long.
Step 2: Print template
| pumpkin_inside_a_pumpkin_template.pdf |
Step 3: Cut out template
Step 4: Bend up stems
Slightly bend up the end of the leaf stems, large and little pumpkin stem and the vine curl so that it looks a little like a spring.
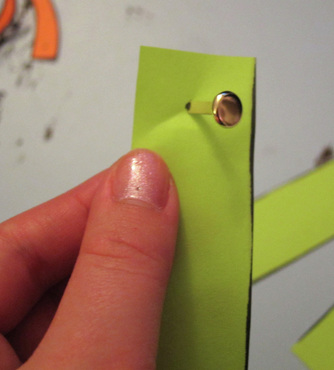
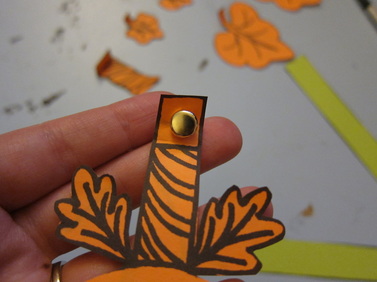
Step 5: Attach the first thumbtack
To begin assembling your big pumpkin take one of the cut out strips and push the tack through the dot marked at the end. Then attach each of the other strips.
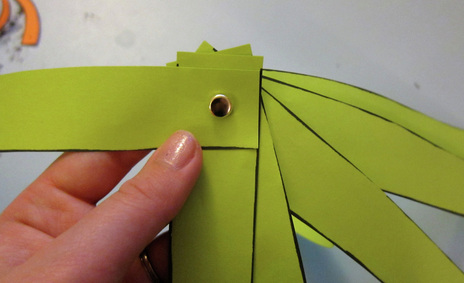
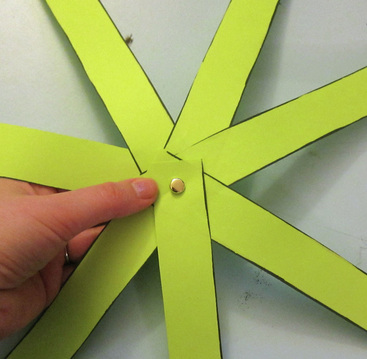
Step 6: Evenly space the strips, flip over and close the tack.
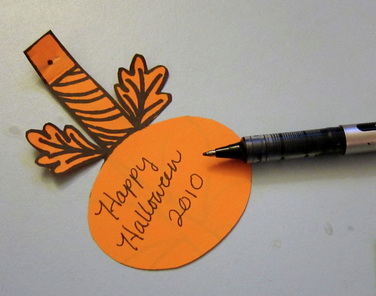
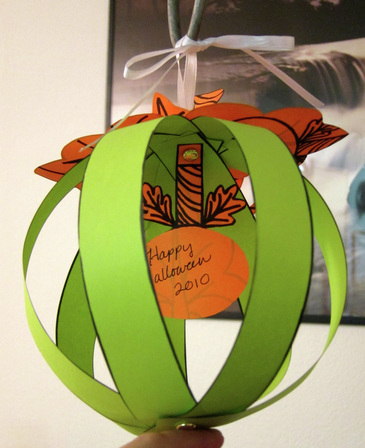
Step 7: Write your little pumpkin message
Write any message on the small pumpkin you like. It could be Halloween 2010 or maybe The Smith Family 2010. You could also put a mini family photo on the back if you like.
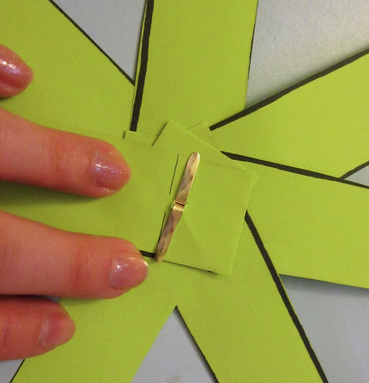
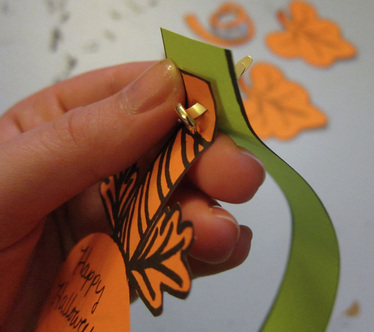
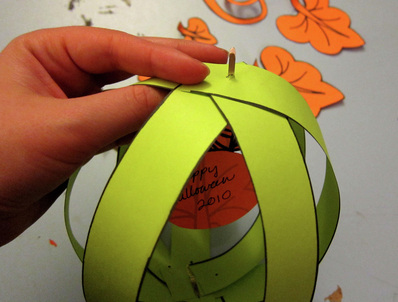
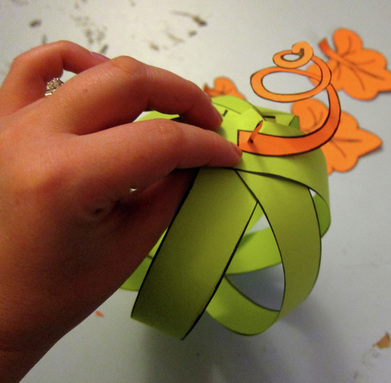
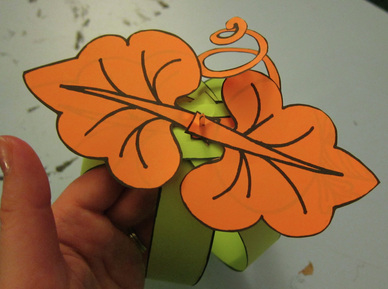
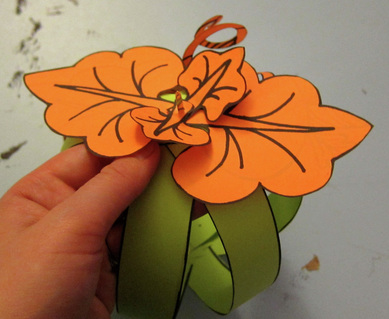
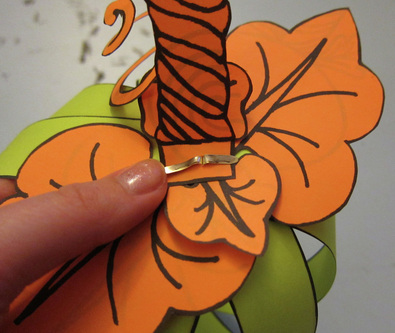
Step 8: Attach the second thumbtack
This will assemble the top of your pumpkin. Push the tack upward through the remaining pieces in the following order (same as photos).
1 - small pumpkin, 2 - strips, 3 - vine curl, 4 - big leaves, 5 - small leaves, 6 - stem
Close tack afterward.
1 - small pumpkin, 2 - strips, 3 - vine curl, 4 - big leaves, 5 - small leaves, 6 - stem
Close tack afterward.
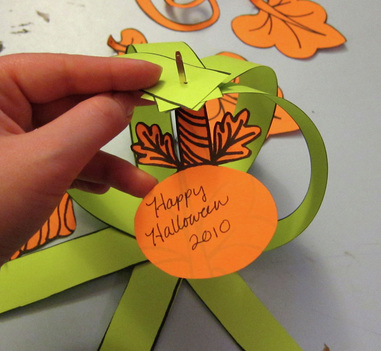
Step 9: Place and enjoy!

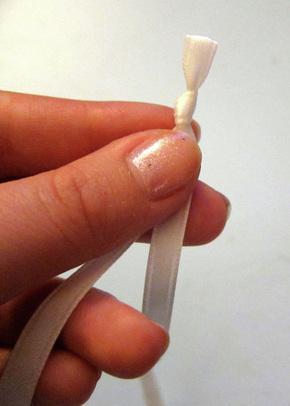
Step 10: Hanging option
If you would like to hang your pumpkin inside a pumpkin, take a piece of ribbon and tie a small loop in the middle. Re-open the top tack closure, place loop around end and re-close. Then hang and enjoy!

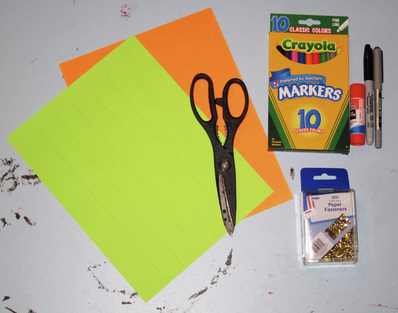
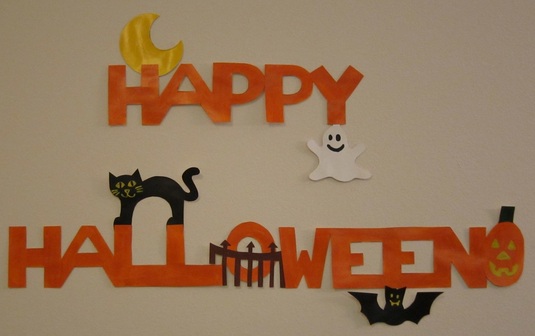
Halloween Celebration Banner

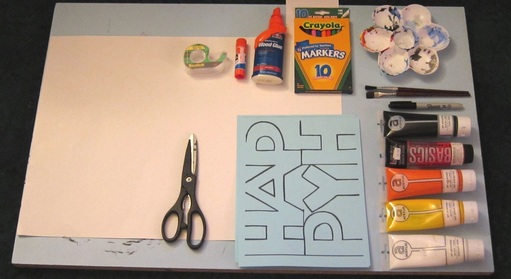
Step 1: Gather Materials
For this craft you will need: printing paper, poster board, orange, yellow, black, brown and green paint, paint brushes, paint palette, scissors, marker/pen, glue and tape. Depending on the age of the children helping, you may want to also have newspaper and papertowells handy.
Note about paint: I recommend using craft acrylic paint because it dries quickly and is washable with soap and water.
Note about paint: I recommend using craft acrylic paint because it dries quickly and is washable with soap and water.
Step 2: Print Template
Download the file below and print it from your computer. Dending on your preferance, you may also wish to print the template for the gate that may go infront of the "O".
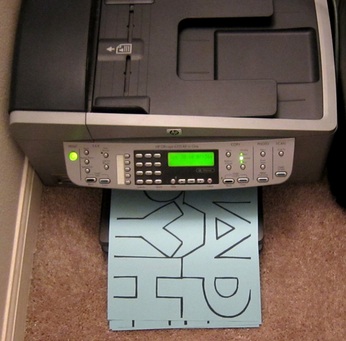
| happy_halloween_banner_template.pdf |
| gate_template.pdf |
Step 3: Cut Out Template
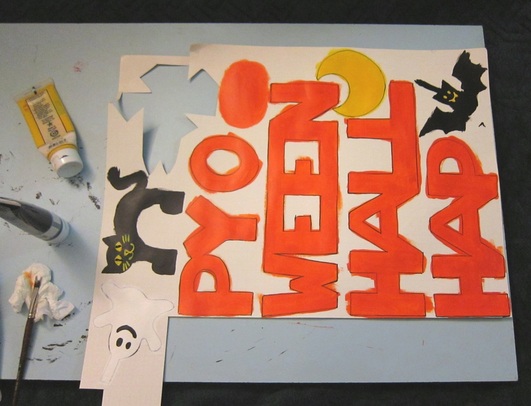
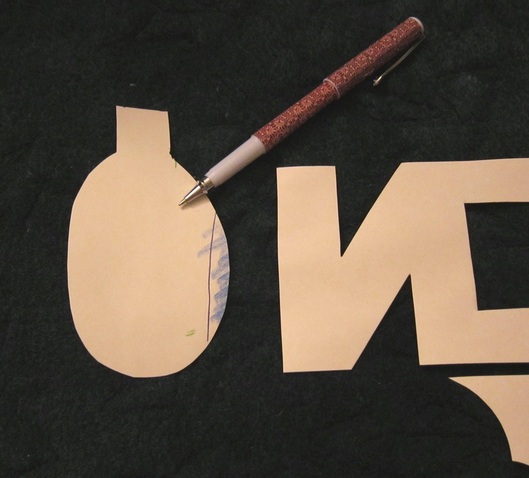
I printed my template on blue paper to make it easier to see in the photos. If you would prefer not to paint, you can print the letter pages on orange paper and the remaining page on white paper. You will just need to color in the moon, ghost, bat and cat on your own then.
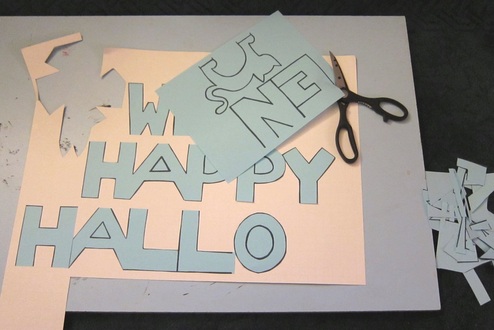
Step 4: Line Up and Trace
Once all of the pieces are cut out, line them up on the poster board and trace them with a pen or marker. Skip this step if you are not painting.
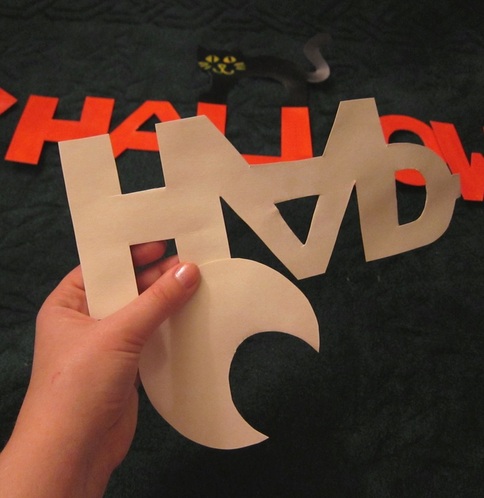
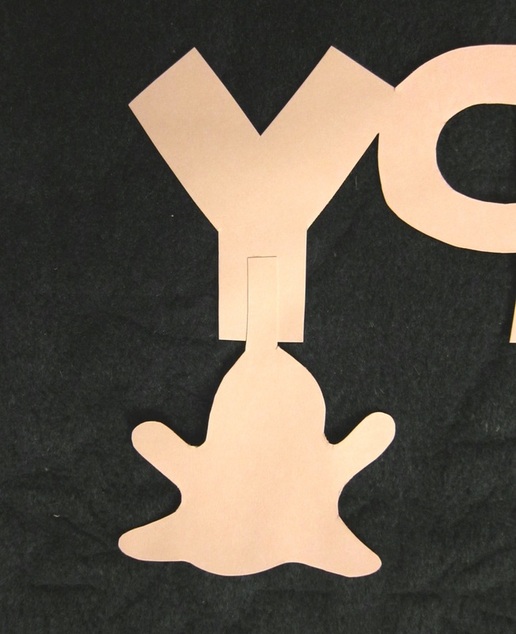
When lining up the pieces be sure to match up the "H" at the beginning of Halloween with the "A" in Halloween so that it looks like the H and A in Happy. Also be sure to leave room for you to create a small tab on the curved part of the first "P" in Happy, and tabs at the bottoms of the cat's feet. These will be used to help attach the banner together later.
When lining up the pieces be sure to match up the "H" at the beginning of Halloween with the "A" in Halloween so that it looks like the H and A in Happy. Also be sure to leave room for you to create a small tab on the curved part of the first "P" in Happy, and tabs at the bottoms of the cat's feet. These will be used to help attach the banner together later.
Step 5: Paint the letters Orange
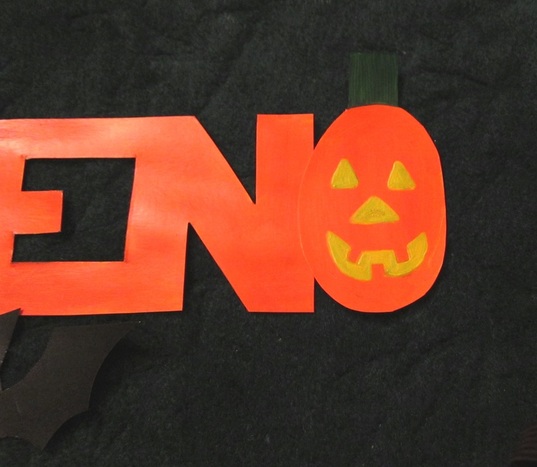
When you are done painting the letters, if you have orange paint left over, you may wish to paint a Jack-O-Latern as shown in the picture to attach to the end of the banner.

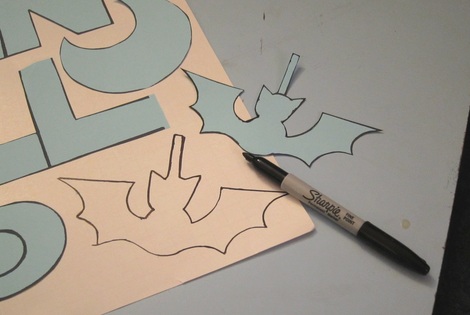
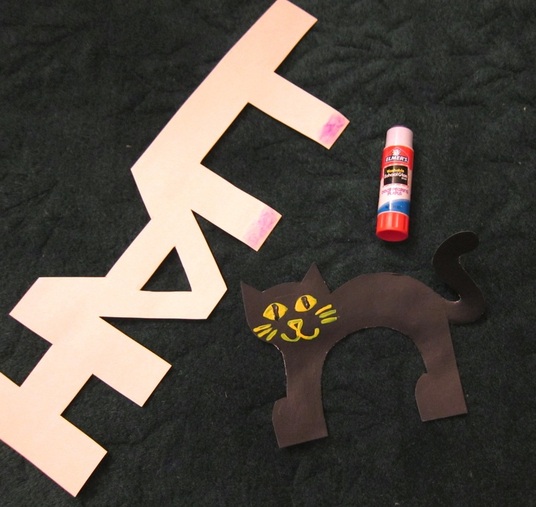
Step 6: Paint the bat and cat black

Step 7: Paint the moon yellow and the ghost white
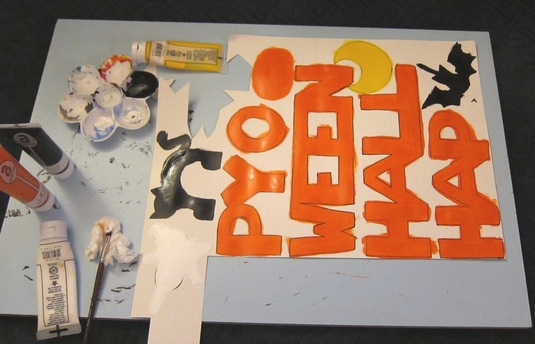
Step 8: Allow the paint to dry. This will take 15 to 25 minutes.
Step 9: Paint faces on the bat, cat and ghost.
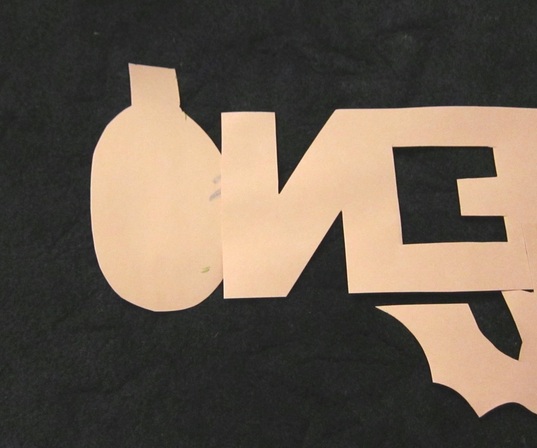
Step 10: While the faces are drying cut out the letters, then cut out the bat, cat and ghost.
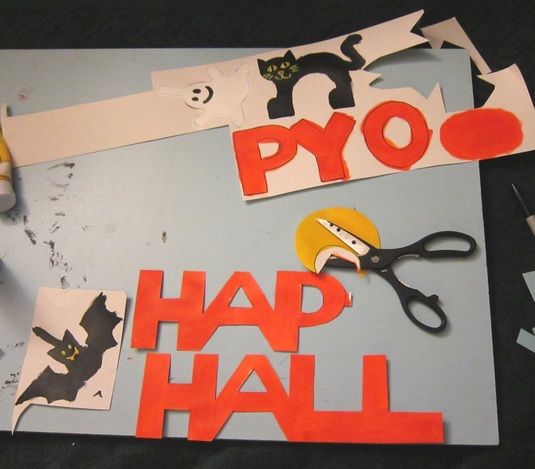
Step 11: Line up
Now that everything is dry and cut out, line up your banner in order seeing how you would like to place teh moon, ghost, bat and cat.
Step 12: Glue the moon
Note on glue: I like to use Elmer's purple glue stick, because it is much easier to see where you have placed the glue and makes overlapping pieces easier.
Step 13: Glue the ghost
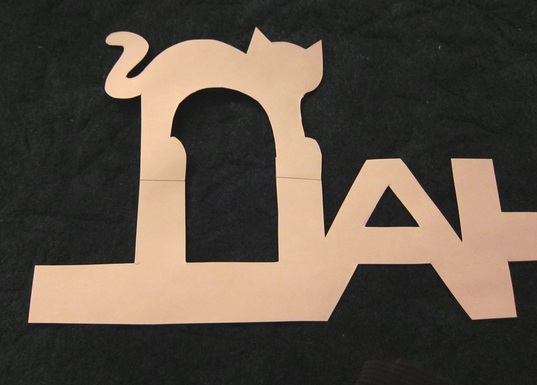
Step 14: Glue the cat
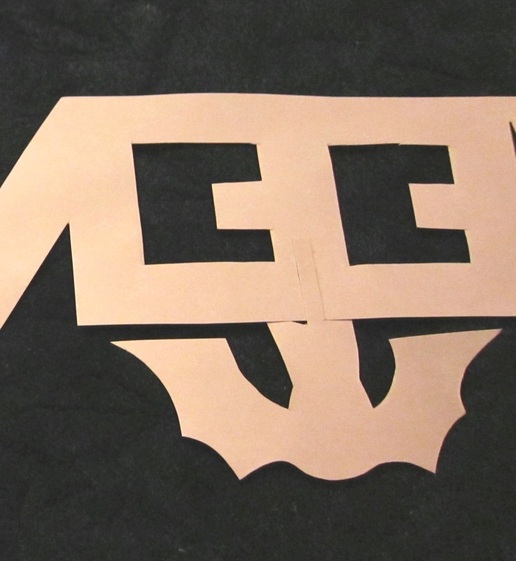
Step 15: Glue bat
Step 16: If you made a Jack-O-Latern, line it up, trace the back where it overlaps and glue in place.
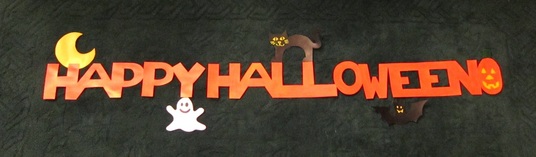
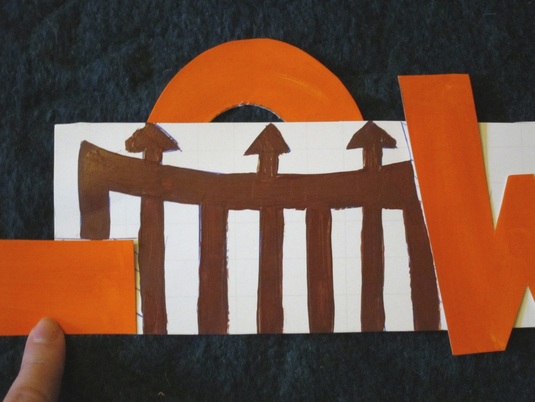
Step 17: Gate Option
If you decided to make the gate, here is a picture to show how it overlaps with the L and W to fit into place. The L and W will overlap the gate on top and the O will be overlaped with the gate on top.
Step 18: Now that everything is glued in place, let it dry.

Step 19: Hang up and enjoy!
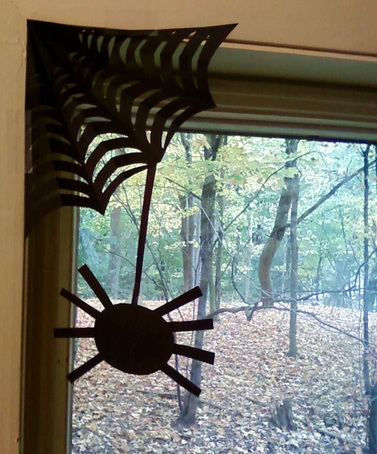
My Friend In The Corner
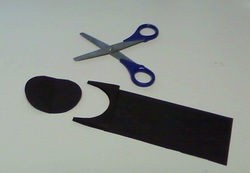
Step 1: Gather Materials
For this craft you will need: scissors, glue or tape, one piece of 8 1/2" x 11" black paper. You may also like to gather white crayons, white paint and brush and googly eyes.
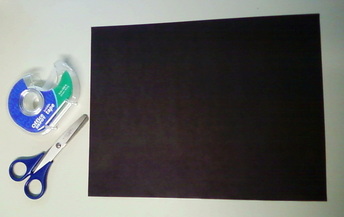
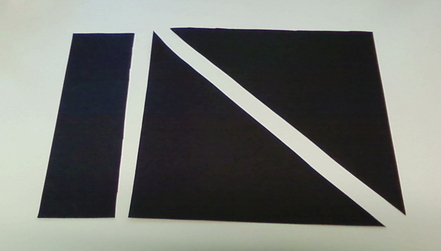
Step 2: Fold a large triangle
Take one of the top corners and fold it so that the top edge of the paper is even with the bottom edge.
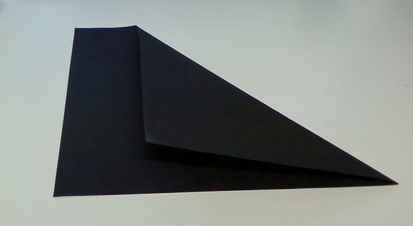
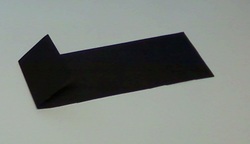
Step 3: Fold a rectangle
Take the excess paper on the left side and fold it toward the right so that the bottom edge of the paper is even and creates a rectangle.
Step 4: Unfold and cut off rectangle

Step 5: Cut triangles apart
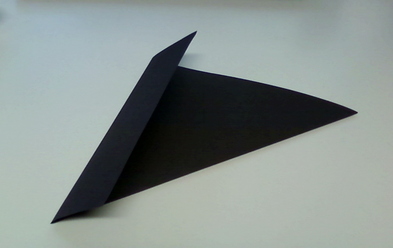
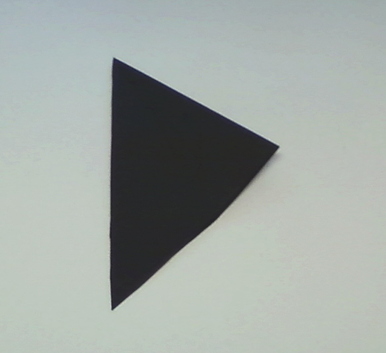
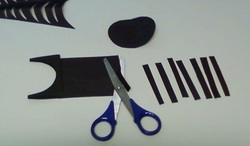
Step 6: Fold one of the triangles
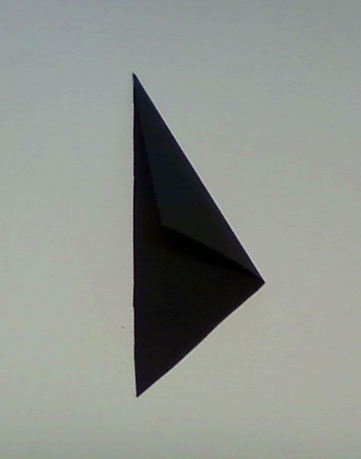
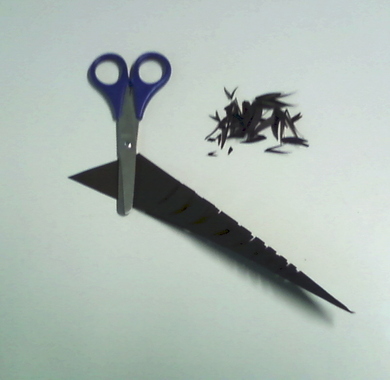
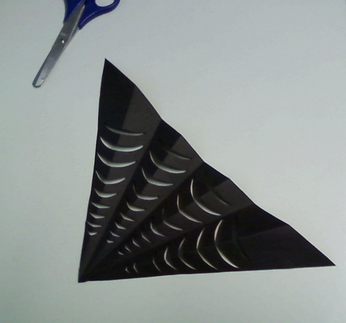
Align one of the triangles so that it forms a right angle and the "middle" point is in the corner. Next fold the triangle in half, with the fold leading to the "middle" point. Fold the triangle again as before. Then unfold the triangle and refold like an accordion, lining up the four original fold marks.
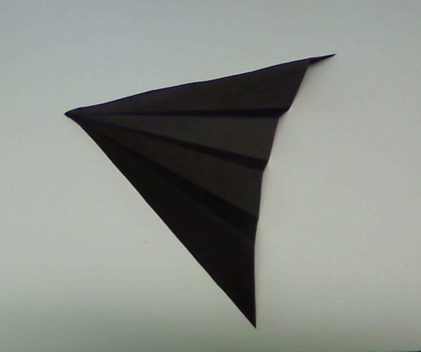
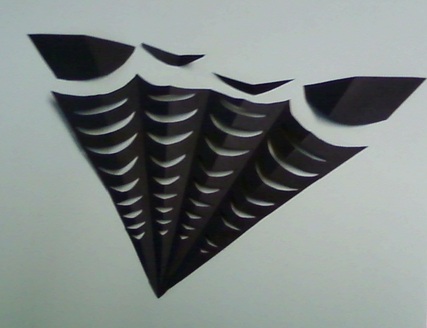
Step 7: Cut the web
Cut the slits in the web starting at now the smallest point and working toward the large end. Be sure to cut the slits like half "smiles" so that the arch is away from the wide end.
Step 8: Unfold the web
Step 9: Cut arches in webbing
Step 10: Fold end of rectangle
Step 11: Cut out body
Step 12: Cut out legs
Step 13: Attach legs with tape or glue
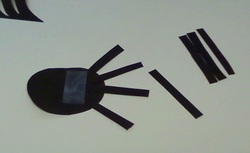
Step 14: Cut out hanging strand
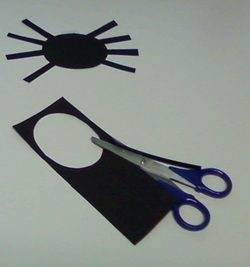
Step 15: Attach hanging strand to body
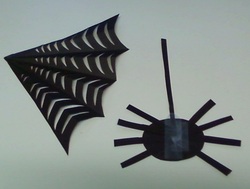
Step 16: Attach hanging strand to web
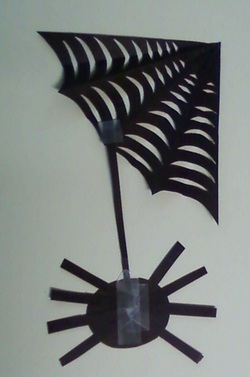
Step 17: Hang your new friend in a window or doorway and enjoy!
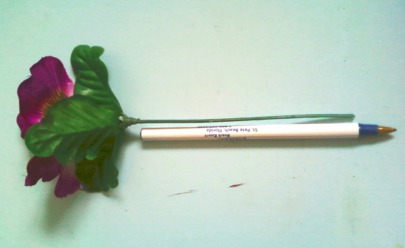
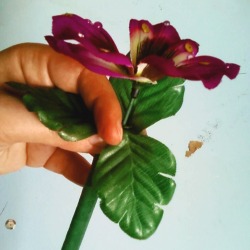
Sparkling May Flower Pens
Please note! This craft requires adult supervision! It is recommended for children under 12 years old to have adult supervision during the use of a hot glue gun or anytime one is plugged in and hot or heating up in your home. For children 12 to 17 use your best judgment regarding supervision.
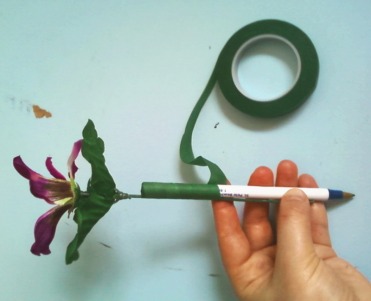
Step 1: Gather Materials
For this craft you will need: Silk flowers, pens, floral tape, scissors, sequins and a hot glue gun.
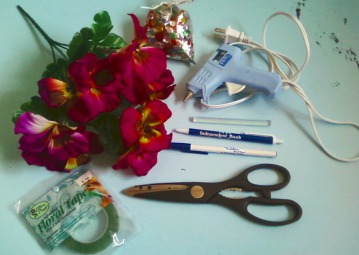
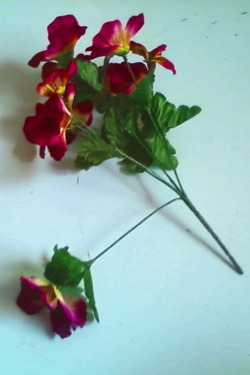
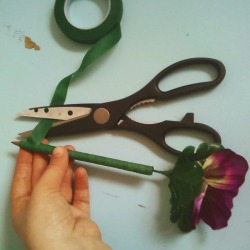
Step 2: Select Your Flower
Decide which of the flowers of the bunch you would like to use for your flower pen and bend it down and away from the others.
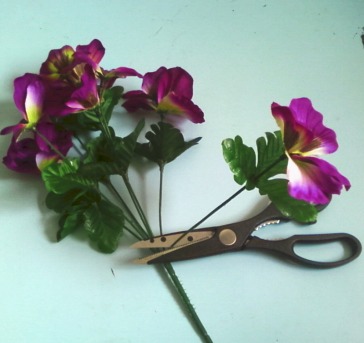
Step 3: Score Your Flower
Using the scissors, score the flower stem close to the base and create a gap in the plastic coating to expose the wire inside.
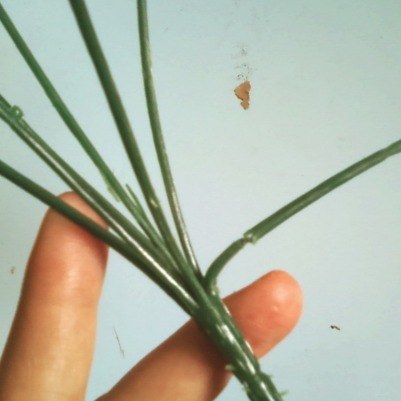
Step 4: Bend Stem and Break
Gently bend the stem at the scored mark until it breaks off. You may need to bend the stem back and forth several times for it to detach.
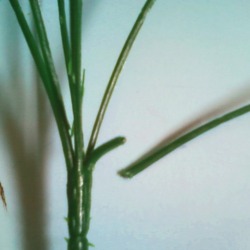
Step 5: Check Length of Stem
Double check the length of your flower stem to the length of the pen you will be using. Below is a picture of the longest length I recommend using. If your stem is longer you can wrap it around your pen, creating a spiral or twisted look. Or you can re-score your stem at the length you would like and bend it as in the previous step to shorten it.
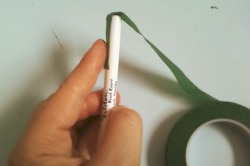
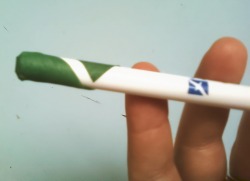
Step 6: Wrap End of Pen
Take the floral tap and lay a piece up over and down the end of the pen. Cut the floral tape and wrap so that the end is no longer showing.
Step 7: Wrap Pen
Hold the flower stem next to the pen, with the flower and leaves as close to the end of the pen as possible. Take the end of the floral tap and wrap it one of two times around the end of the pen keeping it straight. Then begin wrapping the pen downward at a slight angle. Be sure to overlap the tap as you go down. This will make sure that you cover all of the pen and that the tape will hold in place. Floral tape is unique because it will stick to itself and not to objects around it so you need to be sure to overlap the tape to hold it in place.
When you are done wrapping, cut the end of the tape. Wrap the last bit of end and press it with your fingertips to hold it in place.
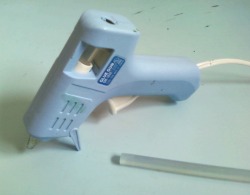
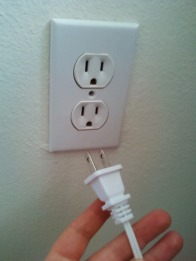
Step 8: Plug In Glue Gun
Ask your parent or an adult helping you with the craft to plug in the glue gun so that it can begin heating up. Remember it will get very hot so stand it upright and away from anything else on the crafting surface you are using. Only set on a kitchen counter or wood cutting board.
Parents or adult crafters should keep a watchful eye on hot glue guns when they are around children and minors. To prevent burns and to keep the hot glue gun from being an ignition source keep all other materials and flammable objects away and clear!
Parents or adult crafters should keep a watchful eye on hot glue guns when they are around children and minors. To prevent burns and to keep the hot glue gun from being an ignition source keep all other materials and flammable objects away and clear!
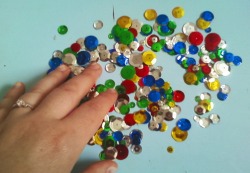
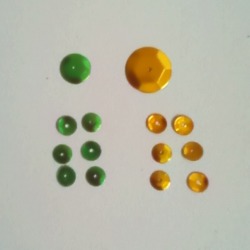
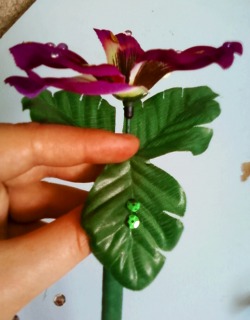
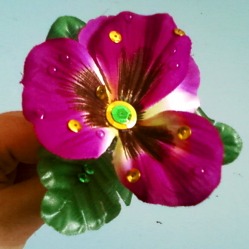
Step 9: Pick Your Sparkles
Pick which sequins you would like to use. I picked out 14 total. 1 Large and 1 medium sequin for the middle of my flower. 6 small for the flower petals. And 6 small for the flower leaves. You can pick as many or as few of any size and color you would like.
Step 10: Check If Glue Gun Is Ready
Ask your parent or an adult helping you with the craft to check if the glue gun is ready to use. This can be done by gently pulling the trigger by the handle and seeing if the glue easily comes out of the tip. DO NOT TOUCH A HOT GLUE GUN ON THE METAL END! IT IS VERY HOT AND MAY BURN YOUR HAND!
Step 11: Attach Your Sparkles
Ask your parent or the adult helping you with these next few steps. They can use the glue gun and you can show them where you would like your sparkles.
Attach the large sequin you choose to the middle of the flower.
Attach the large sequin you choose to the middle of the flower.
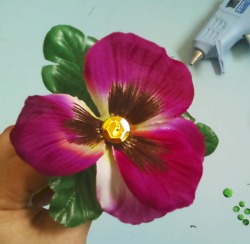
Now attach the medium sequin on top of the large one in the middle.
Attach your sparkles to the flower petals. I choose 2 sequins per petal.
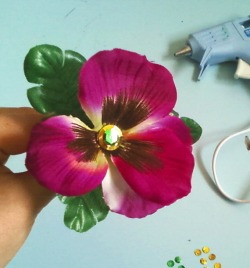
Step 12: Create Dew Drops
Have your parent or the adult helping you with the craft make the dew drops. Just let them know where you would like them to come.
You can create the dew drops by gently getting a small dab of glue to touch the flower petal. While it is still attached by a strand of glue to the glue gun move your hand around the spot in a circle. This will detach the tread and help form the spot into a rounded dome. It will dry clear and look just like a drop of water.
You can create the dew drops by gently getting a small dab of glue to touch the flower petal. While it is still attached by a strand of glue to the glue gun move your hand around the spot in a circle. This will detach the tread and help form the spot into a rounded dome. It will dry clear and look just like a drop of water.
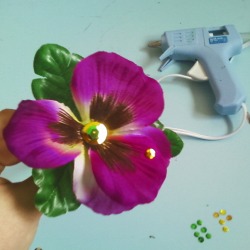
Step 13: Attach Leaf Sparkles
Ask your parent or the adult helping you attach sparkles to your leaves. They can use the glue gun and you can show them where you would like your sparkles.
I choose to place two sparkles in the middle of the vein on my leaves. Bend down the leaf so that you can more easily attach the sequins.
I choose to place two sparkles in the middle of the vein on my leaves. Bend down the leaf so that you can more easily attach the sequins.
Step 14: Unplug Glue Gun
Ask your parent or the adult helping you to unplug the glue gun. Remember to set it up on its end and away for all other materials and objects until it is completely cooled.
Step 15: Let Your Flower Cool Down
The glue on your flower may still be hot but will cool down soon.
Step 16: Enjoy!
Go ahead and use your Sparkling May Flower Pen!
Our first project is ready for you!
Thank you for visiting our new craft page! Help yourself to our first project:
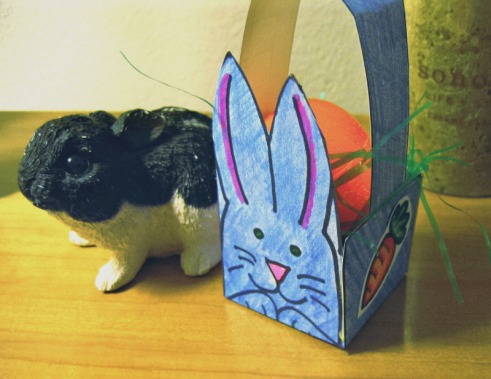
Hoppy Easter Treat Basket.
Hoppy Easter Treat Basket.
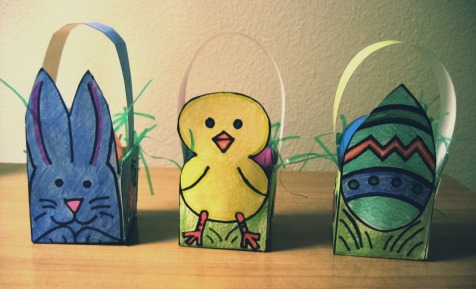
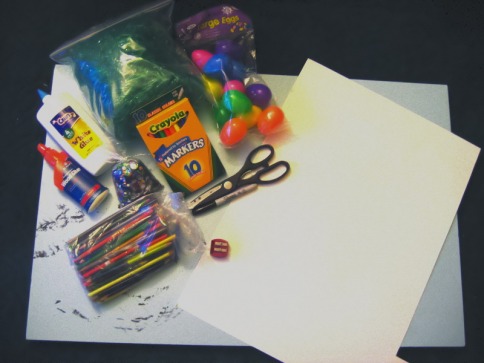
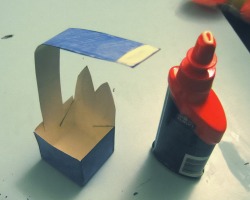
Step 1: Gather Materials
You will need: scissors, markers/crayons/color pencils, glue or tape, construction paper/poster board, Easter grass and a plastic Easter egg. If you are using color pencils you may also want to grab a sharpener.
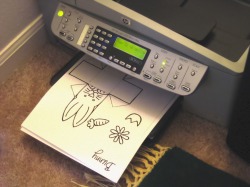
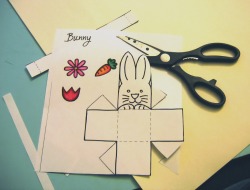
Step 2: Print Template
Download and print our Hoppy Easter Treat Basket Template.
Download and print our Hoppy Easter Treat Basket Template.
| hoppy_easter_treat_basket_templates.pdf |
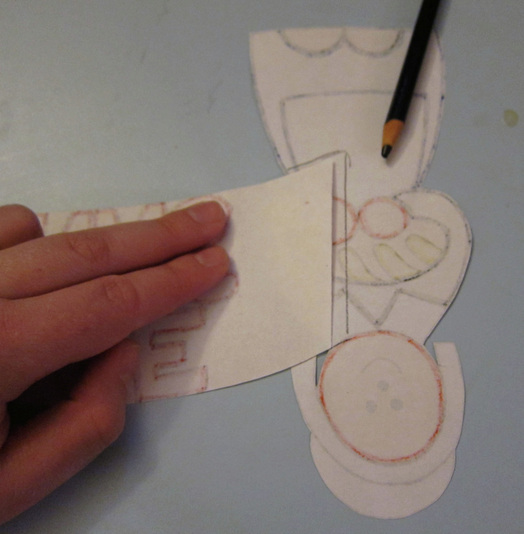
Step 3: Cut Out and Trace
If you would like to make your basket out of poster board or construction paper, cut out the template and trace it onto the paper you will be using. Remember if you are using poster board to trace it onto the matte side of the board so that your color pencils and crayons will show up better.
If you would like to make your basket out of poster board or construction paper, cut out the template and trace it onto the paper you will be using. Remember if you are using poster board to trace it onto the matte side of the board so that your color pencils and crayons will show up better.
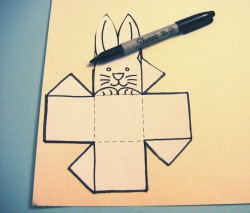
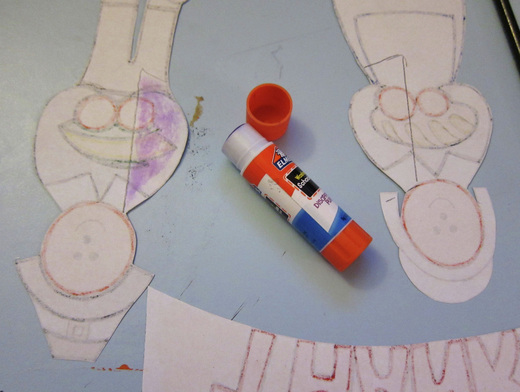
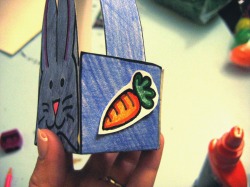
Step 4: Color
Color your basket any way you would like. My bunny basket is blue. But don't forget you will want to color the handle and decorations too.
Color your basket any way you would like. My bunny basket is blue. But don't forget you will want to color the handle and decorations too.
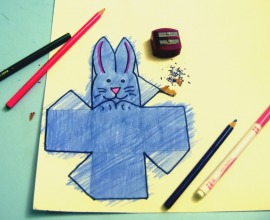
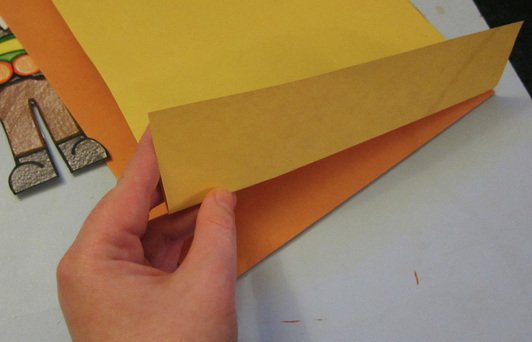
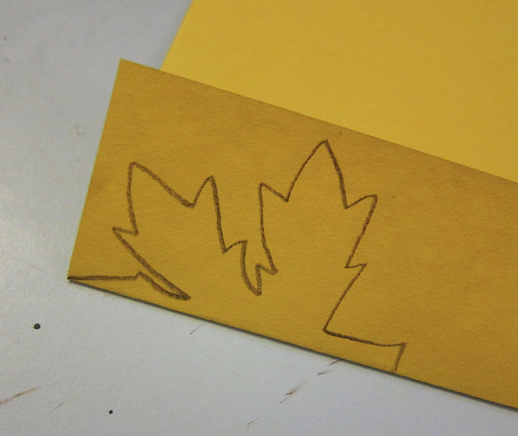
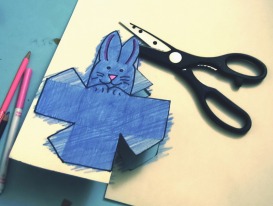
Step 5: Cut Out
Now that you are done coloring, cut out all of your pretty pieces and put them next to one another.
Now that you are done coloring, cut out all of your pretty pieces and put them next to one another.
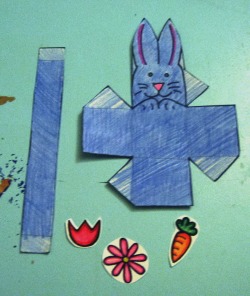
Step 6: Fold
Fold the four sides up from the bottom of the basket. Fold the triangle flaps on each side in toward the middle of the side.
Fold the four sides up from the bottom of the basket. Fold the triangle flaps on each side in toward the middle of the side.
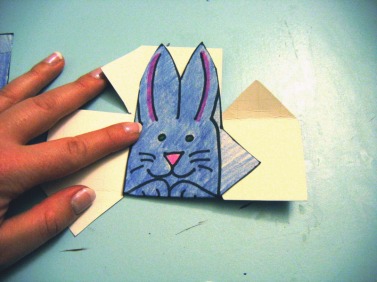
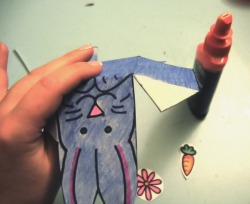
Step 7: Glue Or Tape it Together
Using your glue or tape put your basket together. Glue the triangle flaps to the inside of the side next to it. Then glue the handle to the inside of the right and the left of the basket - in this case to the right and left of the bunny's face. I decided to put the decorations in the middle of three sides, but you can place them anywhere you want. Wait for the glue to dry before going to the next step.
Using your glue or tape put your basket together. Glue the triangle flaps to the inside of the side next to it. Then glue the handle to the inside of the right and the left of the basket - in this case to the right and left of the bunny's face. I decided to put the decorations in the middle of three sides, but you can place them anywhere you want. Wait for the glue to dry before going to the next step.
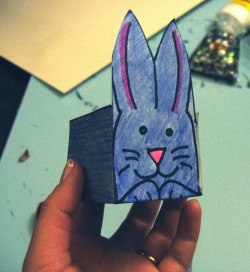
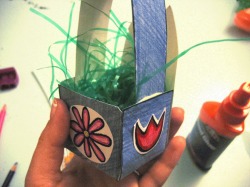
Step 8: Fill
Fill your basket with Easter grass. Now pick a colorful Easter egg and place it in your basket.
Fill your basket with Easter grass. Now pick a colorful Easter egg and place it in your basket.
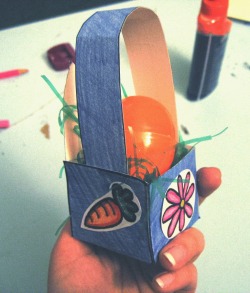
Step 9: Enjoy!
:Please feel free to share this project with friends and family. This project is not for sale and should not be sold to anyone. All rights reserved copyright Susan Marie 2010.
